If you’ve been looking for a bold and beautiful Tunisian crochet blanket pattern that’s just as fun to make as it is to snuggle under, you’re going to love the Frosted Star Blanket.
This free pattern combines the gorgeous texture of the Tunisian star stitch with an eye-catching entrelac layout, resulting in a cozy and modern design.
Whether you’re brand new to Tunisian crochet or looking for a relaxing project to add to your winter lineup, this is the one to bookmark.
🧶 Why You’ll Love the Frosted Star Blanket
- Worked on the diagonal in entrelac-style squares for visual interest
- Textured star stitch gives it a handmade, high-end feel
- Simple border with single crochet and camel stitch finishes it off cleanly
- Uses only two colors for a bold checkerboard look
- Looks complicated, but it’s broken into easy-to-follow square instructions
It’s beginner-friendly if you’ve already dabbled in Tunisian crochet and extremely satisfying if you love color play and modular construction.
📏 Blanket Size + Gauge
- Finished size: 41" wide x 55" long
- Gauge: 16 Tunisian simple stitches (TSS) x 12 rows = 4" x 4"
✅ This is a great size for a throw blanket, couch companion, or gift.
🧵 Materials
To make the Frosted Star Blanket, you'll need:
Yarn
- Yarn A: Caron Blossom Cakes in “Caribbean Sea” – 2 cakes (approx. 962 yds) - Can purchase HERE
- Yarn B: Big Twist Value Pound Plus in “Ivory” – 1 skein (approx. 1096 yds) - Can purchase HERE
🌈 Tip: You can easily substitute any #4 worsted weight yarn — or play with color for a completely custom look.
Hooks
- 6.5 mm Tunisian crochet hook (long or with cable) - one used in the video is from Furls here
- 5 mm standard crochet hook (for the border) - one used in the video is from Furls here
Check out some of my favorite Tunisian and regular crochet hooks in my Amazon storefront HERE.
Notions
- Tapestry needle
- Scissors
🔁 Pattern Construction Overview
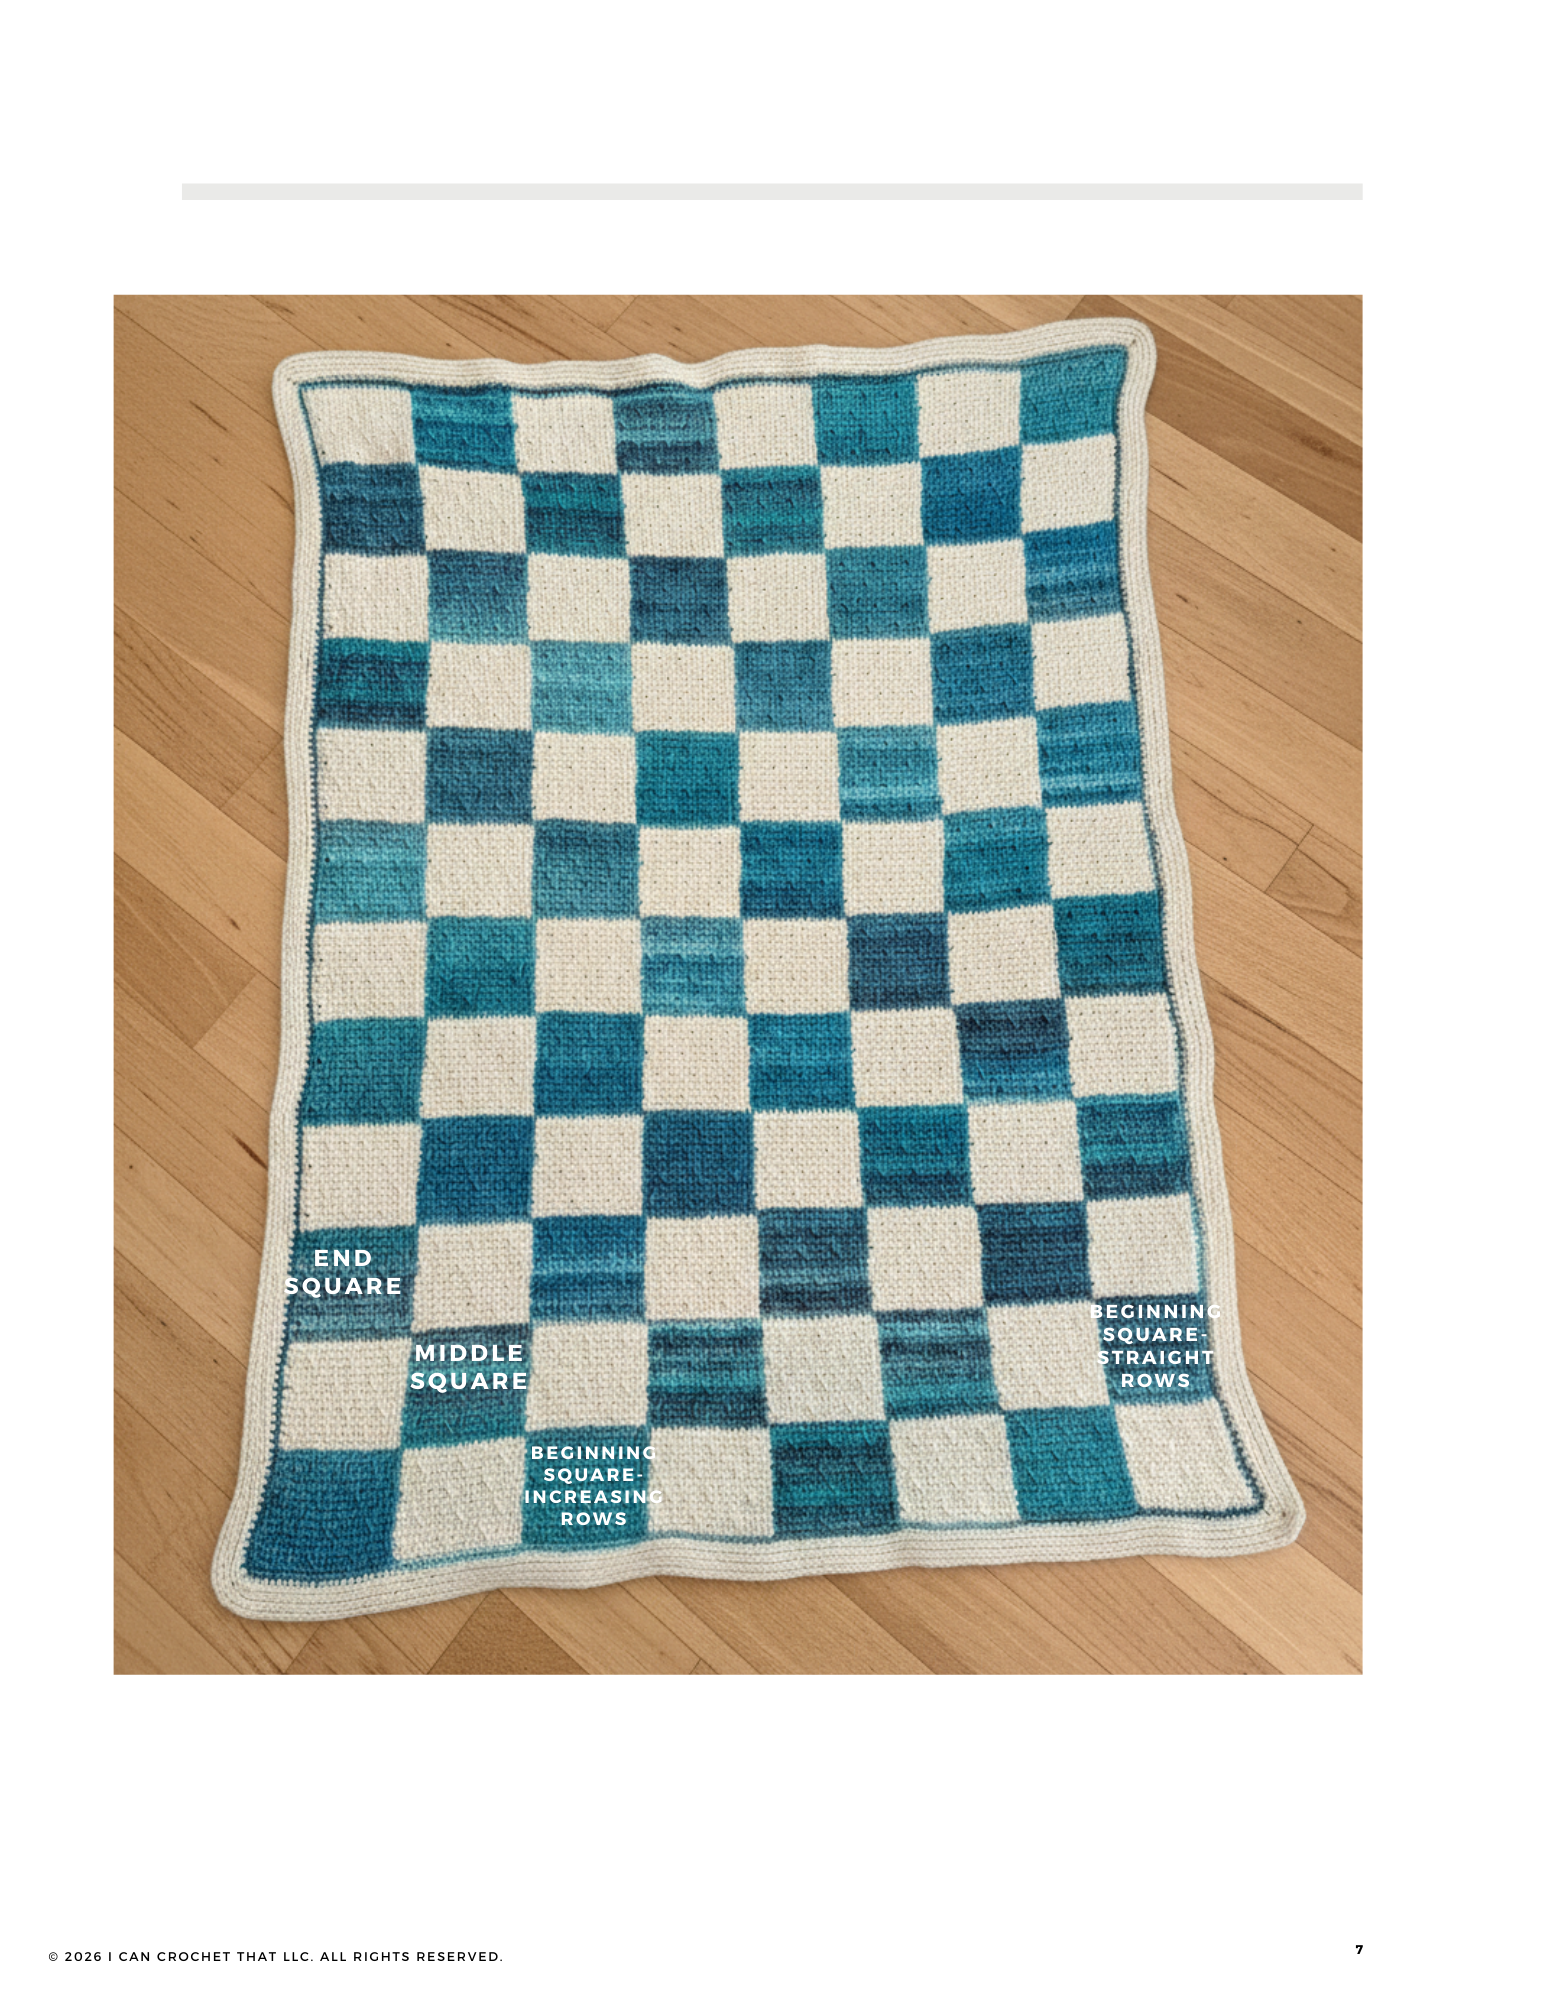
The blanket is worked in diagonal rows made up of squares using a Tunisian entrelac method. Instead of writing out every row, the pattern includes repeatable square instructions:
Types of Squares
- First Square – the foundation of the blanket (Row 1)
- Beginning Square – starts each diagonal row
- Middle Square – fills the row
- End Square – completes the row
Each diagonal row builds on the previous, increasing to full width, continuing straight, then decreasing back down.
📸 Refer to the diagram for a helpful layout guide.
🧵 Stitches & Techniques Used
- Tunisian Simple Stitch (TSS)
- Tunisian Star Stitch (Tss3tog Star)
- Single Crochet (SC)
- Half Double Crochet (Camel Stitch style)
- Slip Stitch (SL ST)
A video tutorial is also available to walk you through the techniques and square joining process.
📺 Be sure to watch the Tunisian Entrelac video tutorial for visual learners!
🧩 How the Pattern is Worked
Here’s a quick peek at how the construction progresses:
Increasing Rows
Start with 1 square and add one per row:
- Row 1: First Square (Yarn A)
- Row 2: Beginning + End Square (Yarn B)
- Continue alternating colors through Row 8
Straight Rows
Once full width is reached:
- Rows 9–12: 1 Beginning Square + 6 Middles + 1 End Square
- Alternate Yarn A and B every row
Decreasing Rows
Remove one square per row until the final square:
- Rows 13–19: Gradual decrease until 1 square remains
🪡 Finishing with a Simple + Stunning Border
This pattern finishes with a two-part border that gives it structure and polish:
Round 1: Single Crochet Border (Yarn A)
Worked evenly around with 4 SC in each corner.
Rounds 2–3: Camel Stitch Border (Yarn B)
Using HDC in the 3rd loop for that faux-knit look.
🧼 Don’t forget to block your blanket lightly to even out the stitches and help the squares lay flat.
Stitch Abbreviations
ch chain
rep repeat
sc single crochet
hdc half double crochet
hdc 3rd loop half double crochet third loop only
Tss Tunisian simple stitch
Tss3tog star Tunisian simple stitch 3 together star
yo yarn over
FwP forward pass
RetP return pass
Lts last Tunisian stitch
sk skip
sl st slip stitch
Tslst Tunisian slip stitch
st(s) stitches
Special Stitches
Tunisian Entrelac Video tutorial HERE
Work loosely when slip stitching to bind off – you will work into these stitches later.
Tss3tog star: insert hook as for Tss under three vertical bars, pull up a loop, yo, insert hook back through the same three vertical bars, pull up a loop
Two return passes are used:
Return Pass 1: ch 1, *yo, pull through 2 loops, rep from * across
Return Pass 2: *yo, pull through 2 loops across, rep from * across
❄️Frosted Star Blanket Pattern
Row Structure Overview
The blanket is worked in three phases: increasing, straight, and decreasing.
Increasing Rows
The blanket begins by increasing the number of squares in each diagonal row.
- Row 1: First Square only (Yarn A)
- Row 2: Beginning Square + End Square (Yarn B)
- Row 3: Beginning Square + 1 Middle Square + End Square (Yarn A)
- Row 4: Beginning Square + 2 Middle Squares + End Square (Yarn B)
- Row 5: Beginning Square + 3 Middle Squares + End Square (Yarn A)
- Row 6: Beginning Square + 4 Middle Squares + End Square (Yarn B)
- Row 7: Beginning Square + 5 Middle Squares + End Square (Yarn A)
- Row 8: Beginning Square + 6 Middle Squares + End Square (Yarn B)
Straight Rows (Full Width Reached)
After Row 8, the blanket has reached its full width. From this point on, the number of squares across remains the same and the blanket is worked straight to add length.
- Row 9: Beginning Square – Straight Rows + 6 Middle Squares + End Square (Yarn A)
- Row 10: Beginning Square – Straight Rows + 6 Middle Squares + End Square (Yarn B)
- Row 11: Beginning Square – Straight Rows + 6 Middle Squares + End Square (Yarn A)
- Row 12: Beginning Square – Straight Rows + 6 Middle Squares + End Square (Yarn B)
Decreasing Rows
The blanket is finished by decreasing one square per row.
- Row 13: Beginning Square – Straight Rows + 6 Middle Squares (Yarn A)
- Row 14: Beginning Square – Straight Rows + 5 Middle Squares (Yarn B)
- Row 15: Beginning Square – Straight Rows + 4 Middle Squares (Yarn A)
- Row 16: Beginning Square – Straight Rows + 3 Middle Squares (Yarn B)
- Row 17: Beginning Square – Straight Rows + 2 Middle Squares (Yarn A)
- Row 18: Beginning Square – Straight Rows + 1 Middle Square (Yarn B)
- Row 19: Final square of the blanket, worked using the Beginning Square – Straight Rows instructions (Yarn A)
Working Each Row
When working a row, follow the square instructions in the order listed for that row:
- Beginning Square (when applicable)
- Middle Square(s), repeated as indicated
- End Square (only if the row includes one)
Refer to the diagram for visual placement of each square type.
Yarn A: Caron Blossom Cakes
Yarn B: Big Twist Value Pound Plus
You should have 20 loops on your hook after every forward pass for every row.
First Square (Row 1)
Yarn: Yarn A
Hook: 6.5 mm Tunisian crochet hook
With Yarn A, CH 20
Row 1 – Foundation Row
Forward Pass: Insert hook in 2nd back bump from hook, pull up a loop; rep from * across in each remaining back bump
(20 loops on hook)
Return Pass: RetP 1
Rows 2–3
- TSS across
- RetP 1
Row 4 – Star Stitch Row
- TSS 3
- Tss3tog Star
- TSS 3
- Tss3tog Star
- TSS 3
- Tss3tog Star
- Lts
- RetP 1
Rows 5–6
- Repeat Rows 2–3
Row 7 – Star Stitch Row
- TSS 1
- Tss3tog Star
- TSS 3
- Tss3tog Star
- TSS 3
- Tss3tog Star
- TSS 2
- Lts
- RetP 1
Rows 8–9
- Repeat Rows 2–3
Row 10
- Repeat Row 4
Rows 11–12
- Repeat Rows 2–3
Row 13
- Repeat Row 7
Row 14
- TSS across
- RetP 1
Bind-Off Row
- Bind off using TSS bind-off
- Fasten off
Beginning Square – Increasing Rows (Rows 2–8)
Join new color with a SL ST in the bottom-right corner of the previous square.
CH 19
Row 1 – Foundation Row
Forward Pass:
Insert hook in 2nd back bump from hook, pull up a loop; rep from * across in each remaining back bump. For the last stitch, insert hook under the back bar and 3rd bar of the adjacent square’s first row, yo, pull up a loop.
(20 loops on hook) Return Pass: RetP 2
Rows 2–3
- TSS across
- RetP 2
Row 4 – Star Stitch Row
- TSS 3
- Tss3tog Star
- TSS 3
- Tss3tog Star
- TSS 3
- Tss3tog Star
- Lts
- RetP 2
Rows 5–6
- Repeat Rows 2–3
Row 7 – Star Stitch Row
- TSS 1
- Tss3tog Star
- TSS 3
- Tss3tog Star
- TSS 3
- Tss3tog Star
- TSS 2
- Lts
- RetP 2
Rows 8–9
- Repeat Rows 2–3
Row 10
- Repeat Row 4
Rows 11–12
- Repeat Rows 2–3
Row 13
- Repeat Row 7
Row 14
- TSS across
- RetP 2
Bind-Off Row
- Bind off using TSS bind-off
- Last SL ST goes under the first stitch from the First Square
- Do not fasten off if continuing the row
Beginning Square – Straight Rows (Rows 9–19)
Attach yarn to the first stitch of the square from the row below.
Row 1 – Foundation Row
- Pull up a loop in each stitch across
- Join in the first row of the adjacent square
- (20 loops on hook)
- Return Pass: RetP 2
Rows 2–3
- TSS across
- RetP 2
Row 4 – Star Stitch Row
- TSS 3
- Tss3tog Star
- TSS 3
- Tss3tog Star
- TSS 3
- Tss3tog Star
- Lts
- RetP 2
Rows 5–6
- Repeat Rows 2–3
Row 7 – Star Stitch Row
- TSS 1
- Tss3tog Star
- TSS 3
- Tss3tog Star
- TSS 3
- Tss3tog Star
- TSS 2
- Lts
- RetP 2
Rows 8–9
- Repeat Rows 2–3
Row 10
- Repeat Row 4
Rows 11–12
- Repeat Rows 2–3
Row 13
- Repeat Row 7
Row 14
- TSS across
- RetP 2
Bind-Off Row
- Bind off using TSS bind-off
- Last SL ST goes under the first stitch of the bind-off row of the adjacent square
- Do not fasten off unless this is the final square
Middle Square
Row 1 – Foundation Row
- Pull up a loop in each of the next 18 SL STs along the bind-off edge
- Join in the first row of the adjacent square
- (20 loops on hook)
- Return Pass: RetP 2
Rows 2–3
- TSS across
- RetP 2
Row 4 – Star Stitch Row
- TSS 3
- Tss3tog Star
- TSS 3
- Tss3tog Star
- TSS 3
- Tss3tog Star
- Lts
- RetP 2
Rows 5–6
- Repeat Rows 2–3
Row 7 – Star Stitch Row
- TSS 1
- Tss3tog Star
- TSS 3
- Tss3tog Star
- TSS 3
- Tss3tog Star
- TSS 2
- Lts
- RetP 2
Rows 8–9
- Repeat Rows 2–3
Row 10
- Repeat Row 4
Rows 11–12
- Repeat Rows 2–3
Row 13
- Repeat Row 7
Row 14
- TSS across
- RetP 2
Bind-Off Row
- Bind off using TSS bind-off
- Last SL ST goes under the first SL ST of the adjacent square
- Do not fasten off if continuing the row
End Square
Row 1 – Foundation Row
- Pull up a loop in each of the next 18 SL STs along the bind-off edge
- Pull up a loop in the last row of the square below
- (20 loops on hook)
- Return Pass: RetP 1
Rows 2–3
- TSS across
- RetP 1
Row 4 – Star Stitch Row
- TSS 3
- Tss3tog Star
- TSS 3
- Tss3tog Star
- TSS 3
- Tss3tog Star
- Lts
- RetP 1
Rows 5–6
- Repeat Rows 2–3
Row 7 – Star Stitch Row
- TSS 1
- Tss3tog Star
- TSS 3
- Tss3tog Star
- TSS 3
- Tss3tog Star
- TSS 2
- Lts
- RetP 1
Rows 8–9
- Repeat Rows 2–3
Row 10
- Repeat Row 4
Rows 11–12
- Repeat Rows 2–3
Row 13
- Repeat Row 7
Row 14
- TSS across
- RetP 1
Bind-Off Row
- Bind off using TSS bind-off
- Fasten off
Border Instructions
Switch to 5 mm crochet hook for the entire border.
Single Crochet Border (Yarn A)
Attach Yarn A to any corner.
Round 1
- CH 1, 2 SC in same space
- SC in each stitch down the edge to the corner
- 2 SC in last stitch, 2 SC in first stitch
- SC in each stitch across
- 2 SC in last stitch, 2 SC in first stitch
- SC in each stitch down the next edge
- 2 SC in last stitch, 2 SC in first stitch
- SC in each stitch across
- 2 SC in last stitch
- SL ST to first SC
Each corner will have 4 SC total.
Fasten off.
Camel Stitch Border (Yarn B)
Attach Yarn B to any corner.
Note: For Rounds 2–3, all HDC stitches are worked into the third loop (back middle bar) of the stitch. If you’re new to camel stitch, refer to the video tutorial for visual guidance.
Round 1
- CH 2, HDC in same stitch as CH 2
- HDC in each ST down one side of the blanket, (HDC, CH 2, HDC) in the corner
- Repeat from * to * a total of 3 times
- HDC in each ST down the last side of the blanket
- HDC in the same corner as the first HDC of this round
- CH 2, SL ST to first HDC of the round
Rounds 2–3
- CH 2, HDC in the CH-2 corner
- HDC in the third loop of each ST down one side of the blanket, (HDC, CH 2, HDC) in the CH-2 corner
- Repeat from * to * a total of 3 times
- HDC in the third loop of each ST down the last side of the blanket
- HDC in the same corner as the first HDC of this round
- CH 2, SL ST to first HDC of the round
Fasten off and weave in all ends.
You’re done!! Congratulations. Enjoy your new blanket 😊🧶
🔗 Related Patterns You’ll Love
- No-Curl Tunisian Crochet Entrelac Blanket Pattern
- The Bella Blanket - A Tunisian Crochet Waffle Baby Blanket
- The Taylor - Tunisian Crochet Sampler Blanket
- Tunisian Crochet Sweater Scarf Pattern
📌 Final Thoughts
The Frosted Star Tunisian Crochet Blanket is a showstopper, but it’s designed to be achievable. Whether you’re gifting it or keeping it for yourself, the structured texture, striking color blocks, and modular build make this a relaxing and rewarding project.
🧶 Grab your yarn and hook, and start creating your own frosted beauty!