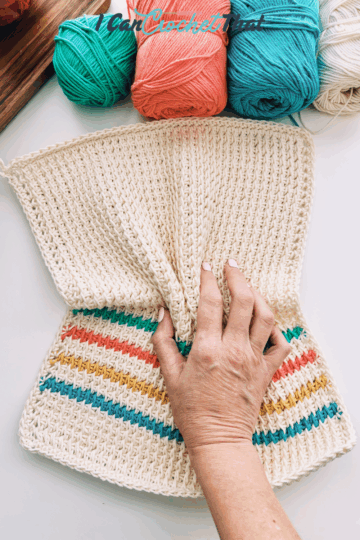
Are you looking for a simple yet beautiful crochet project? Look no further! The double crochet blanket is perfect for beginners and those of you who have been crocheting as long (or longer) than I have!
Keep scrolling to get our free Coastal Stripes Throw pattern, a blanket made entirely with double crochet stitches.
With its straightforward stitch pattern, this blanket works up quickly and can be customized in countless ways to suit your style.
Are you new to crochet? No worries! We'll guide you through creating a stunning double crochet blanket, answer common questions about yarn requirements, and share tips for adding finishing touches.
We'll also give you a free double crochet blanket pattern, of course!
Purchase the Printable PDF Version Below
Can You Make a Blanket with Just Double Crochet?
Absolutely! The double crochet stitch is versatile and easy to master, making it an excellent choice for crafting a blanket.
Here's why using just the double crochet stitch can create a beautiful and functional blanket:
1. Simplicity and Speed
The double crochet stitch is one of the most basic stitches in crochet, making it perfect for beginners. Its simplicity allows you to work quickly, covering large areas relatively quickly. This means you can complete a cozy blanket without spending months on the project.
I'd say that's a win-win!
2. Versatility
While the stitch itself is simple, the double crochet offers a lot of versatility in terms of design.
You can create a solid, uniform look using a single color or play with stripes, color blocks, and ombre effects to add visual interest. The double crochet stitch can be combined with other stitches or used in different techniques (such as working in the back loop only, like the pattern we created) to create various textures.
3. Texture and Warmth
A double crochet blanket has a lovely, warm, and breathable texture. The stitch creates a fabric that is dense enough to provide warmth while still being flexible and soft.
This makes it ideal for everything from baby blankets to larger throws and bedspreads.
4. Easy Customization
One of the best things about using the double crochet stitch for a blanket is how easy it is to customize the size. Whether you want a small baby blanket or a large throw, you can adjust the pattern to fit your needs simply by adding or subtracting stitches and rows.
This flexibility makes it a go-to pattern for any blanket project.
Here's the double crochet blanket pattern in the same yellow as The Finley.
Examples of Double Crochet Blankets
- Solid Color Blanket: Create a classic and timeless piece with a single color. This is a great option for showcasing a favorite yarn or color.
- Striped Blanket: Use multiple colors to create stripes. This can be a fun way to use leftover yarn and add a pop of color to your home décor. Here are some crochet color combination ideas for you.
- Textured Variations: To add unique textures to your blanket, experiment with working in the back loop only or combining double crochet with other stitches.
A blanket made entirely of double crochet stitches is possible and a fantastic project for anyone looking to create a cozy, beautiful, and customizable piece.
How Much Yarn Do I Need for a Double Crochet Blanket?
When starting a crochet blanket, one of the most common questions is, "How much yarn do I need?" If you're working off a pattern you've purchased, the pattern should tell you how much yarn you'll need.
But if you're winging it and getting creative, we'll help you figure out approximately how much yarn you'll need.
The amount of yarn required for a double crochet blanket depends on several factors, including the blanket size, yarn weight, and hook size.
Here's a guide to help you estimate the right amount of yarn for your project.
Factors Affecting Yarn Quantity:
- Blanket Size: The larger the blanket, the more yarn you'll need. Common sizes include baby, throw, and bed-sized blankets (twin, queen, king). This post lays out all of the common blanket sizes
- Yarn Weight: Thicker yarns (like bulky or super bulky) will require fewer yards than lighter yarns (like DK or worsted) for the same size blanket.
- Hook Size: A larger hook can create a looser fabric, which may require slightly less yarn. A smaller hook will create a denser fabric and might require more yarn.
Yarn Estimation Chart:
| Blanket Size | Approximate Dimensions | Yarn Weight | Approximate Yardage Needed |
|---|---|---|---|
| Baby Blanket | 30" x 35" | Worsted (4) | 800-1000 yards |
| Throw Blanket | 50" x 60" | Worsted (4) | 1400-1600 yards |
| Twin Bed Blanket | 66" x 90" | Worsted (4) | 2200-2600 yards |
| Queen Bed Blanket | 90" x 90" | Worsted (4) | 3000-3500 yards |
| King Bed Blanket | 108" x 90" | Worsted (4) | 3500-4000 yards |
Tips for Purchasing Yarn:
- Buy Extra: It's always a good idea to purchase more yarn than you think you'll need. This ensures you have enough, especially if you miscalculate or decide to add a border.
- Dye Lots: If your yarn has dye lot numbers, buy all your yarn from the same dye lot to ensure consistent color throughout your blanket.
- Keep Labels: Save the labels from your yarn skeins. They contain important information like dye lot numbers and care instructions, which can be useful if you need to buy more yarn later.
We hope this info helps you confidently determine how much yarn you need for your double crochet blanket!
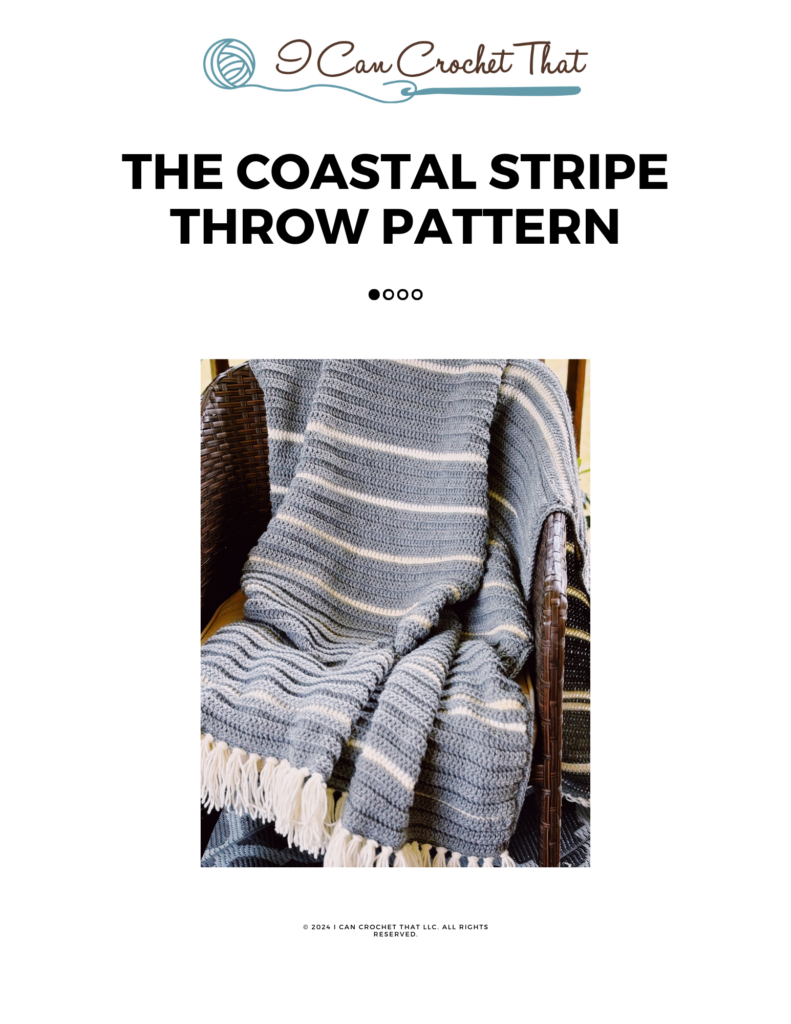
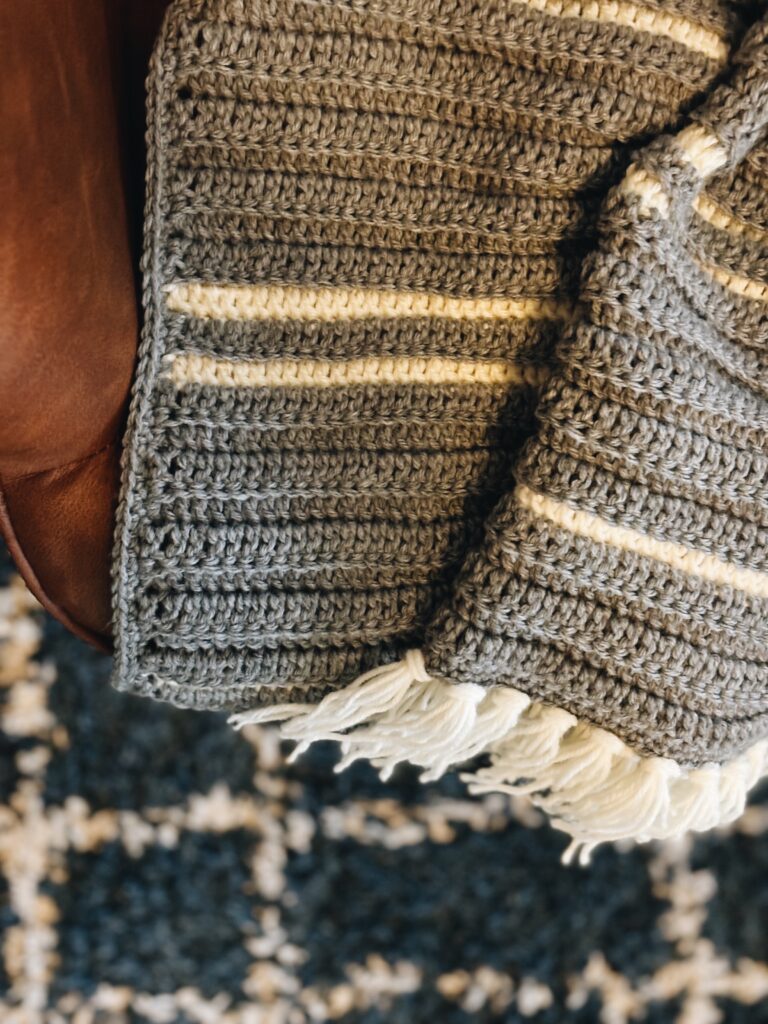
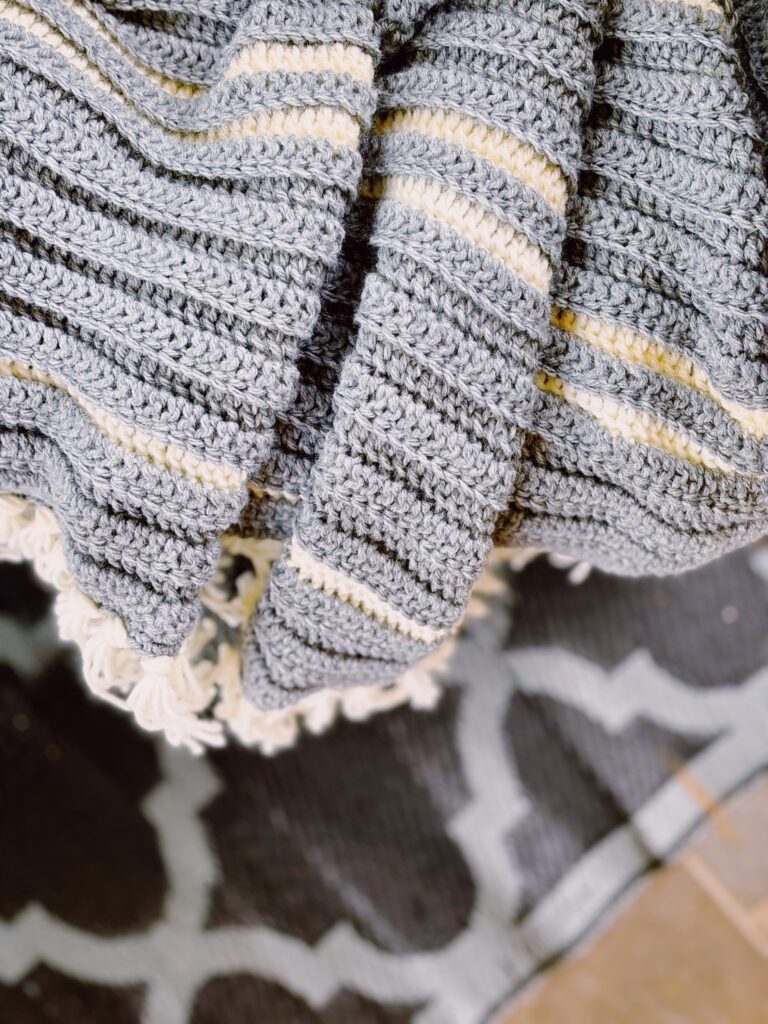
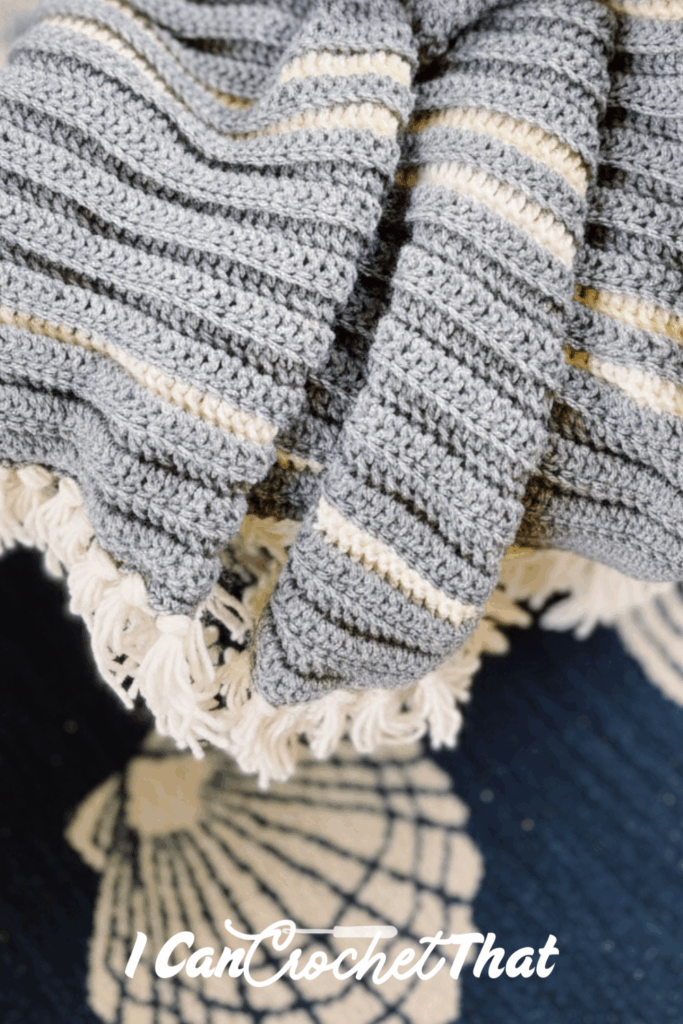
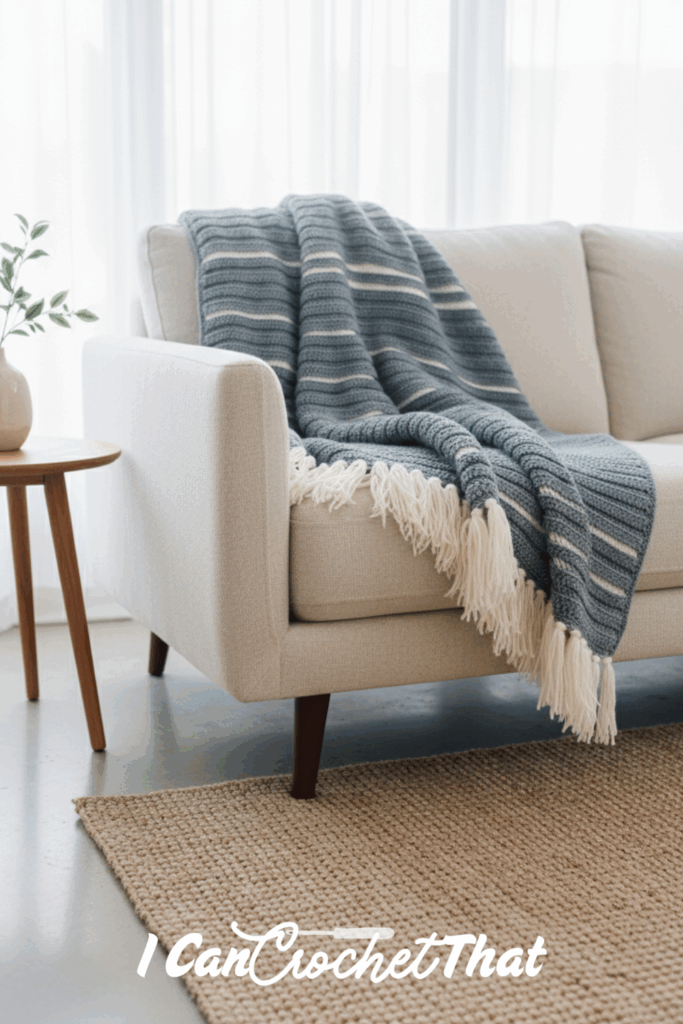
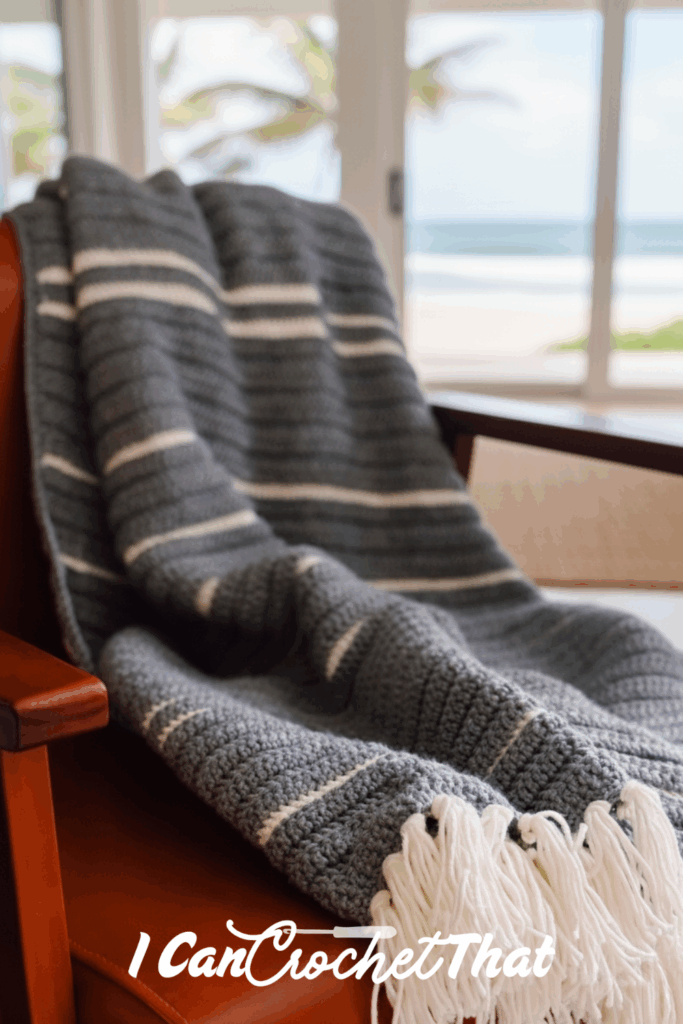
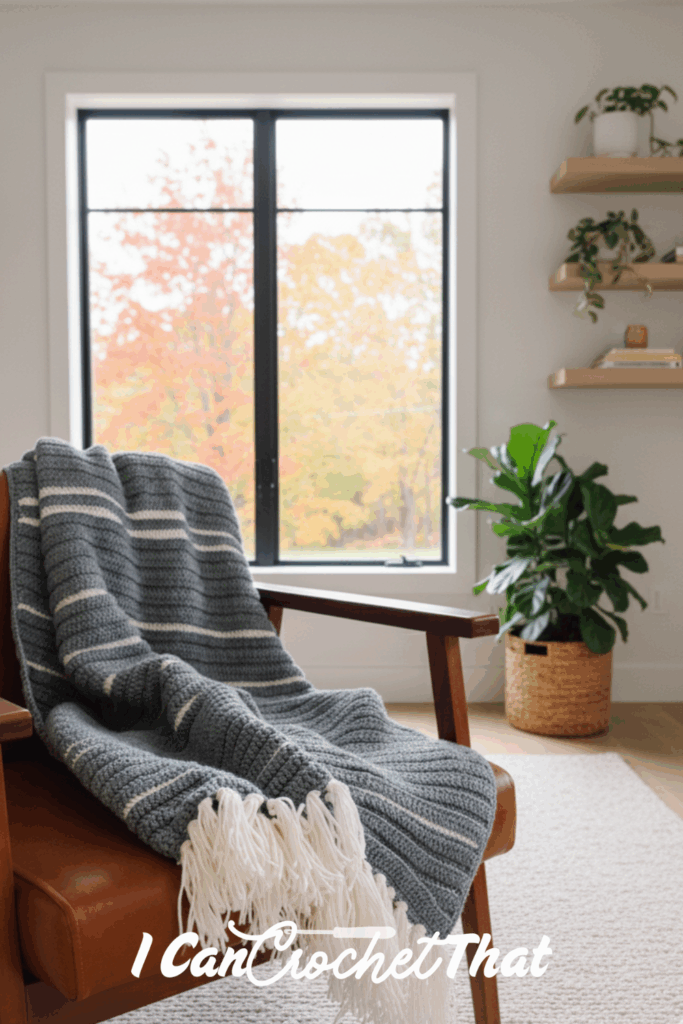
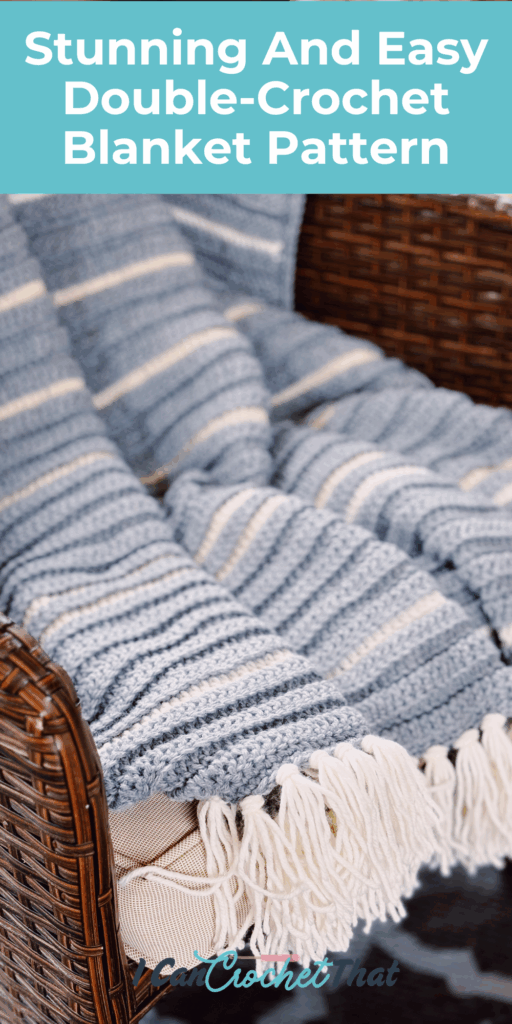
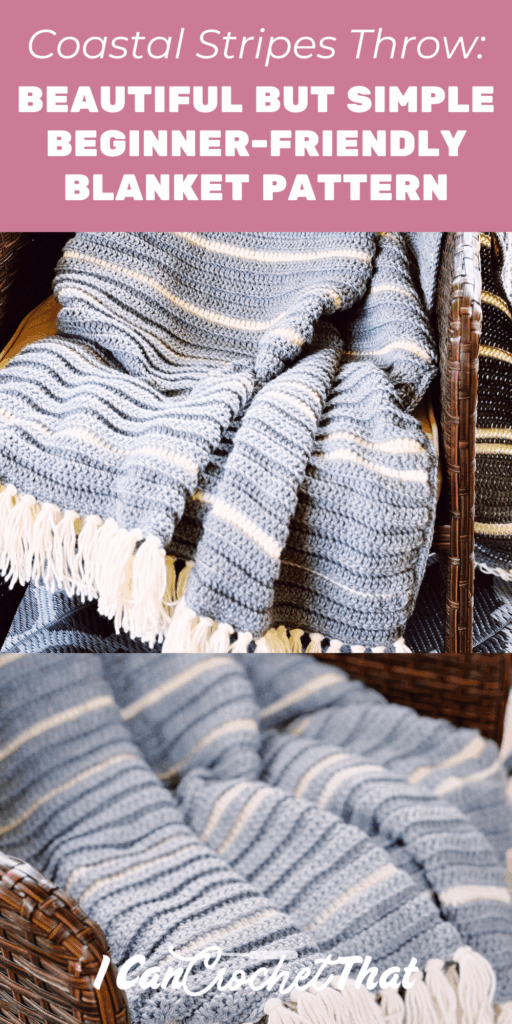
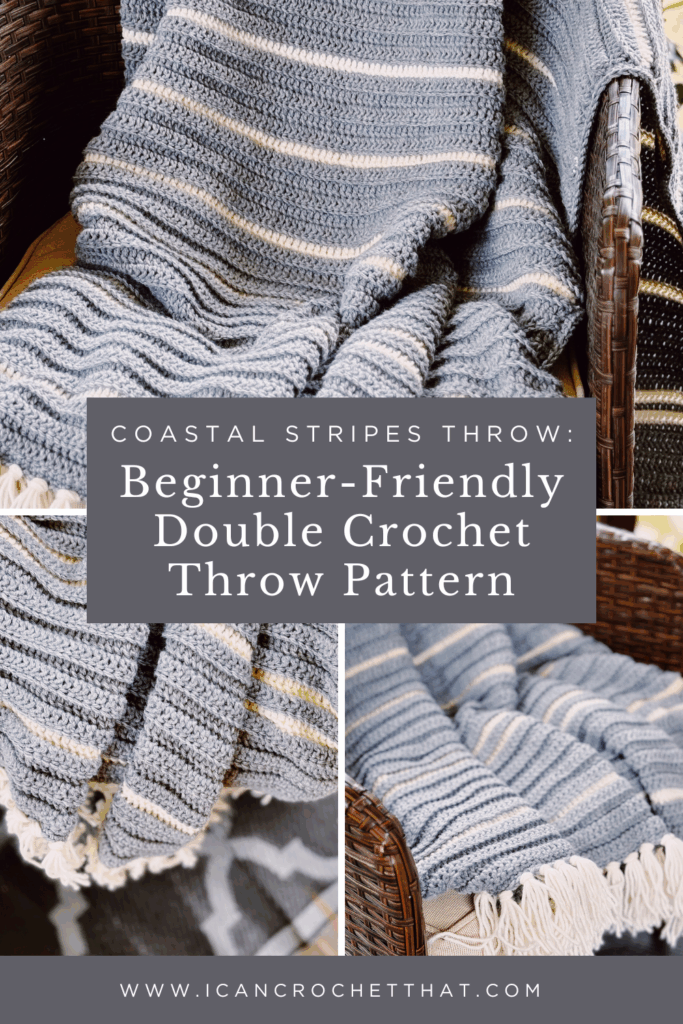
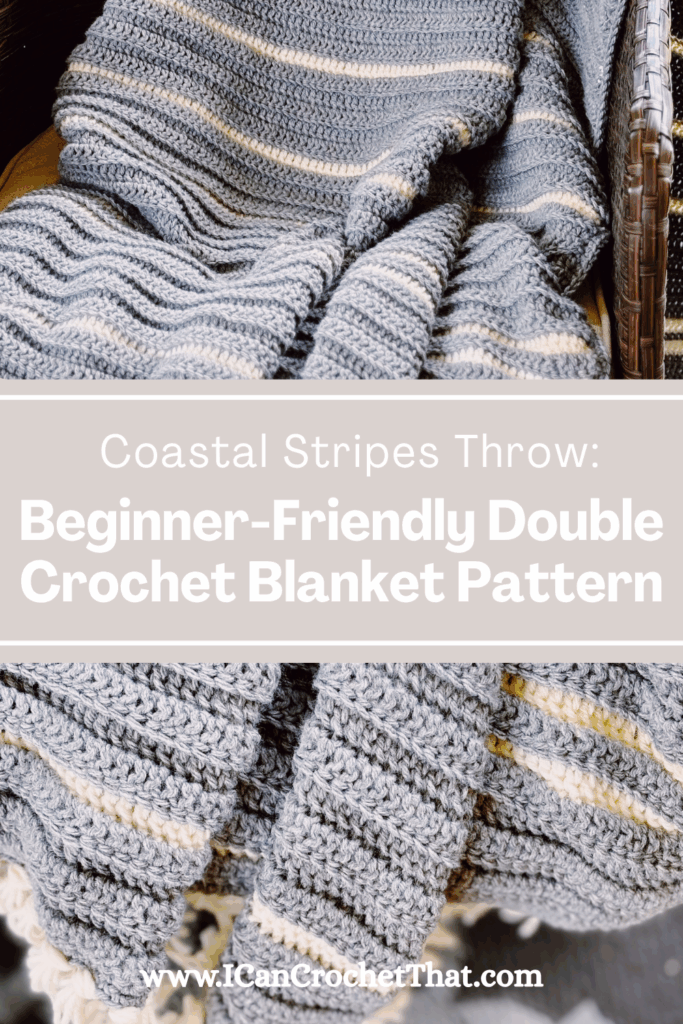
Free Double Crochet Blanket Pattern - The Coastal Stripes Throw
Purchase the Printable PDF Version Below
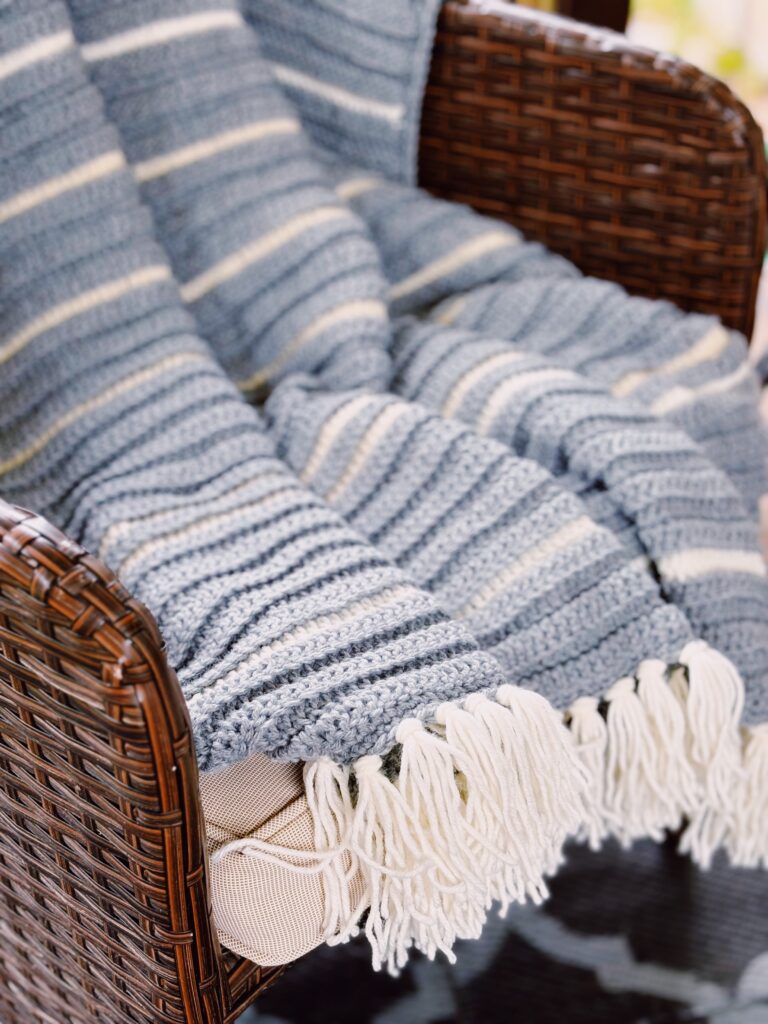
While browsing the West Elm website, I came across their Coastal Stripe Throw and instantly fell in love with its simplicity.
And, of course, I thought, "I Can Crochet That!"
So here's my take on the Coastal Stripe Throw, done only in double crochet stitches.
Description:
Crochet your very own West Elm-inspired throw with this easy double crochet blanket pattern. The Coastal Stripe Double Crochet Blanket pattern is designed with beginners in mind, using simple double crochet stitches worked back and forth in rows. The stripe pattern is achieved with basic color changes, creating a sophisticated look without the complexity. Whether you're new to crochet or looking for a relaxing project, this pattern is perfect for creating a stylish and cozy addition to your home decor.
Wrap yourself in the comfort of handmade elegance with the Coastal Stripe Double Crochet Blanket, and enjoy the satisfaction of creating a beautiful piece that rivals high-end designs.
NOTES:
- Finished size measures 38” wide x 65″ long
- To change the length, simply add more rows following the stripe pattern
- To change the width, simply chain any number
- ch 2 does not count as stitch
- 2sc means 2 scs in same stitch
- This pattern uses ½ a skein of Lion Brand’s Pound of Love yarn for the stripes and fringe, so you will have some yarn left over (save it for a scrapghan or granny squares!)
- Gauge: (4x4) - 14 sts x 10 ½ rows
- Foundation Double Crochet Video here
- Double Crochet Back Loop Only Video here
- How to Add Fringe to a Crochet Blanket Video here
MATERIALS:
HOOK(S)
H-8/ 5.0 mm crochet hook
YARN
Weight 4 • approx. 2,550 yds
Lion Brand Pound of Love (2 ½ skeins)
Colors:
Oxford Grey (2 skeins)
Antique White (about ½ a skein)
NOTIONS
Scissors
Tapestry needle
ABBREVIATIONS:
ch chain
rep repeat
yo yarn over
dc blo double crochet back loop only
fdc foundation double crochet
sk skip
st(s) stitch(es)
SPECIAL STITCHES:
dc blo - Double Crochet Back Loop Only
yo, insert hook into the back loop only of the next stitch, yo, pull up a loop (3 loops on hook), yo, pull through 2 loops on hook (2 loops on hook), yo, pull through the remaining 2 loops on hook
Foundation Double Crochet Video here
fdc - Foundation double crochet
- Chain two.
- Yarn over, insert hook into very first chain made.
- Pull up a loop (three loops on hook).
- Yarn over, pull through one loop (three loops on hook).
- Yarn over, pull through two loops.
- Yarn over, pull through remaining two loops on hook.
- Yarn over, insert hook into both sides of the BOTTOM of the previous stitch.
- Pull up a loop (three loops on hook).
- Yarn over, pull through one loop (three loops on hook).
- Yarn over, pull through two loops.
- Yarn over, pull through remaining two loops on hook.
Repeat steps 7 - 11 until you reach desired length or number of stitches
Double Crochet Back Loop Only Video here
PATTERN INSTRUCTIONS:
Foundation row: With grey yarn, fdc 152, or alternately Ch 154, dc in 2nd back bump from hook, dc across to end, ch 2, turn (152 sts here and throughout pattern)
Row 1 dc blo in 1st st (remember, ch 2 does not count as a stitch), dc blo in every st across to end, ch 2, turn
Rows 2 - 4: repeat row 1
Row 5: dc blo in 1st st, dc blo in every st across to end, switch to white, ch 2, turn, fasten off grey
Row 6: dc blo in 1st st, dc blo in every st across to end, switch to grey before chaining 2, turn, fasten off white
Rows 7 - 14: repeat row 1 (grey rows)
Row 15: repeat row 5 (grey row)
Row 16: repeat row 6 (white row)
Row 17: repeat row 5 (grey row)
Row 18: repeat row 6 (white row)
Rows 19 - 26: repeat row 1 (grey rows)
Row 27: repeat row 5 (grey row)
Row 28: repeat row 6 (white row)
Rows 29 - 32: repeat row 1 (grey rows)
Row 33: repeat row 5 (grey row)
Row 34: repeat row 6 (white row)
Rows 35 - 38: repeat row 1 (grey row)
Row 39: repeat row 5 (grey row)
Row 40: repeat row 6 (white row)
Rows 41 - 44: repeat row 1 (grey rows)
Row 45: repeat row 5 (grey row)
Row 46: repeat row 6 (white row)
Rows 47 - 50: repeat row 1 (grey rows)
Row 51: repeat row 5 (grey row)
Row 52: repeat row 6 (white row)
Rows 53 - 60: repeat row 1 (grey row)
Row 61: repeat row 5 (grey row)
Row 62: repeat row 6 (white row)
Row 63: repeat row 5 (grey row)
Row 64: repeat row 6 (white row)
Rows 65 - 72: repeat row 1 (grey row)
Rows 73: repeat row 5 (grey row)
Row 74: repeat row 6 (white row)
Rows 75 - 78: repeat row 1 (grey rows)
Row 79: repeat row 5 (grey row)
Row 80: repeat row 6 (white row)
Rows 81 - 84: repeat row 1 (grey rows)
Row 85: repeat row 5 (grey row)
Row 86: repeat row 6 (white row)
Rows 87 - 90: repeat row 1 (grey rows)
Row 91: repeat row 5 (grey row)
Row 92: repeat row 6 (white row)
Rows 93 - 96: repeat row 1 (grey rows)
Row 97: repeat row 5 (grey row)
Row 98: repeat row 6 (white row)
Rows 99 - 106: repeat row 1 (grey rows)
Row 107: repeat row 5 (grey row)
Row 108: repeat row 6 (white row)
Row 109: repeat row 5 (grey row)
Row 110: repeat row 6 (white row)
Rows 111 - 118: repeat row 1 (grey rows)
Row 119: repeat row 5 (grey row)
Row 120: repeat row 6 (white row)
Rows 121 - 125: repeat row 1 (grey rows)
Fasten off grey, weave in all of the ends and then continue to border instructions
Border Instructions
Round 1
With right side facing you (see pictures on next page for what the right side and wrong side look like), attach gray yarn to the corner of the end, ch1,
End 1: 2sc in first st (mark 1st sc with st marker), sc in each st across, ending with 2sc in last st
Side 1: 2sc in first side st, working sc sts evenly along side sts, ending with 2sc in last st
End 2: rep end1
Side 2: rep side 1
sl st to first sc from end 1 (the one with the stitch marker)
Round 2
sc in each st around entire blanket, sl st to first sc, fasten off, weave in ends, continue to fringe instructions
Fringe
Cut 9-inch-long pieces from white yarn. With the right side of the blanket facing you, hold 5 pieces of yarn together and attach to the first st on end 1 (video tutorial here). Attach fringe along the rest of the end, skipping 2 chains in between each one. Do the same for the other end.
Enjoy your new blanket!
Adding a Border to Your Double Crochet Blanket
Adding a border to your double crochet blanket is the perfect way to give it a polished, finished look. A well-chosen border can enhance the overall design, add extra texture, and even help even out any uneven edges.
You don't have to add a border, and in fact, quite a few modern crochet blankets you'll see on Pinterest and Etsy don't have a border. But it can really help!
Here are some simple and attractive border options to consider for your blanket.
1. Single Crochet Border
The single crochet border is a classic and straightforward option. It creates a clean edge that complements any blanket style.
I've done a single crochet border on several of my latest blanket patterns. Here's a video I recorded where I share how to do one on The Penny blanket, a corner-to-corner crochet Blanket Pattern.
2. Shell Stitch Border
The shell stitch border adds a delicate, scalloped edge to your blanket, giving it a touch of elegance.
Check out this simple shell stitch border tutorial from Daisy Farm Crafts.
3. Picot Edge Border
The picot edge border adds a charming, decorative touch to your blanket with little loops along the edge.
Check out this YouTube tutorial that shares an easy picot border for beginners.
Tips for Adding Borders:
- Even Stitch Placement: Space your stitches evenly along the edges to avoid bunching or stretching. This might require some adjustments, especially on the sides of the blanket.
- Color Choices: Choose a border color that complements or contrasts with your blanket. A contrasting color can add a striking finish, while a matching color gives a cohesive look.
- Experiment: Don't be afraid to try different border styles or combine elements from various patterns to create a unique finish.
Adding a border to your double crochet blanket enhances its appearance and adds a personal touch.
Whether you choose a simple single crochet edge or a more intricate shell stitch, your blanket will be a beautiful and functional piece ready to keep you warm and cozy.
Creative Variations for Your Double Crochet Blanket
The double crochet stitch provides a versatile foundation for endless creative variations. You can transform a simple double crochet blanket into a unique masterpiece by experimenting with colors, textures, and embellishments. Here are some creative ideas to inspire your next project:
1. Color Block Blanket
A color block blanket uses large sections of different colors to create a bold, modern look. It's a great way to use up yarn in your stash and add visual interest to your blanket.
- How to Create a Color Block Blanket:
- Choose 3-5 coordinating colors of yarn.
- Decide the order and size of each color block (e.g., equal sections, or one dominant color with smaller accents).
- Work in double crochet, changing colors at the beginning of a row to create distinct blocks.
Check out this post that shares some free crochet color combination ideas.
2. Using Different Yarn Textures and Weights
Combining yarns of different textures and weights can add depth and dimension to your blanket. For example, pairing a soft, fluffy yarn with a smooth, sleek one creates a unique tactile experience.
- How to Combine Different Yarns:
- Choose yarns that complement each other in color and feel.
- Be mindful of gauge differences; you might need to adjust your hook size to maintain consistent stitch tension.
- Alternate between yarns every few rows or use different yarns for specific sections, such as a border or stripes.
3. Adding Embellishments
Enhance your blanket with embellishments like fringe, tassels, or appliqués. These additions can add a playful or sophisticated touch, depending on your preference.
- Fringe: Cut lengths of yarn and attach them to the edges of your blanket using a lark's head knot. Trim to desired length.
- Tassels: Create tassels by wrapping yarn around a piece of cardboard, tying it at one end, and cutting the other. Attach tassels to the blanket corners or evenly along the edges.
- Appliqués: Crochet small motifs like flowers, stars, or hearts, and sew them onto your blanket for added decoration.
I added fringe to The Estes Blanket and The Cora Blanket.
I added tassels to The Kara Blanket and The Drew Throw.
4. Experimenting with Stitch Patterns
While this post focuses on the double crochet stitch, you can add variety by incorporating different stitch patterns within the blanket.
- Back Loop Only: Working double crochet stitches in the back loop only creates a subtle ribbed texture.
- Crossed Double Crochet: Crossing two double crochet stitches over each other adds an intricate, woven look.
- Cluster Stitches: Combining clusters of double crochets can create a bobble or popcorn effect, adding dimension to your blanket.
By exploring these creative variations, you can customize your double crochet blanket to reflect your personal style and preferences.
Whether you choose bold colors, unique textures, or fun embellishments, your blanket will showcase your creativity.
Conclusion
Creating a double crochet blanket is a rewarding project that offers endless possibilities for customization and creativity. With its simple yet versatile stitch, you can craft a beautiful, functional blanket that suits any style or need.
We've covered the basics of making a blanket with just double crochet, how to calculate yarn requirements, and provided detailed instructions for a free pattern.
We also explored how to add a polished border and offered ideas for creative variations to make your blanket truly unique.
We hope you feel inspired to start your own double crochet blanket project. Don't forget to share your progress and finished blankets with us on social media. Join our crochet community for more free patterns, tips, and inspiration. Happy crocheting!
Pin to Save for Later
Pin this post for later!
We'd love to hear from you—leave a comment with your questions or share photos of your finished projects.
Don't forget to subscribe to our newsletter for the latest updates and exclusive content. Plus, you'll receive a free eBook!