Looking for a throw to brighten things up a bit? If so, the Tunisian Crochet Rainbow Blanket Pattern might be the perfect project for you!
Continuing with my never-ending love of designing patterns with self-striping yarn, I am so excited to share this free rainbow crochet blanket pattern with you today.
Purchase a printable version of this pattern on my shop here or Etsy here.
Tunisian Crochet Rainbow Blanket Pattern
The Stitches
Have you tried the Tunisian Crochet Chevron stitch yet? It's become one of my favorites.
I used it for the Aloha blanket I whipped up while living in Hawaii. It was the perfect addition to our lanai. And yep, I used self-striping yarn for it...of course.
But for the rainbow blanket, I did something a little different by bringing in a neutral color yarn + self-striping yarn.
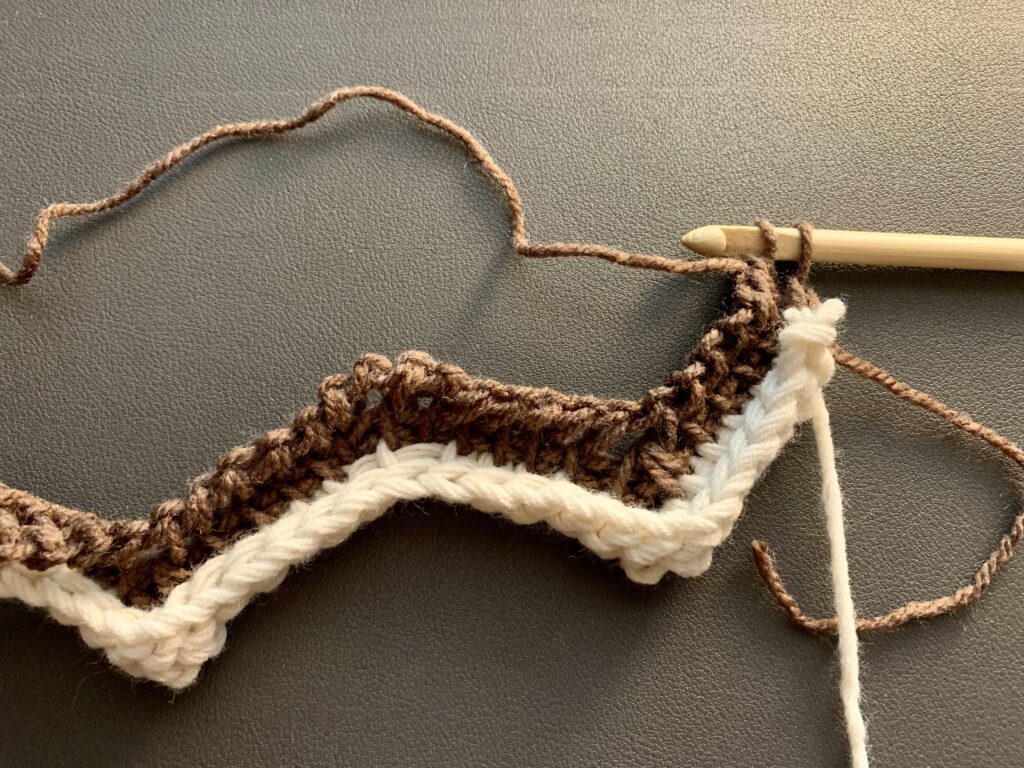
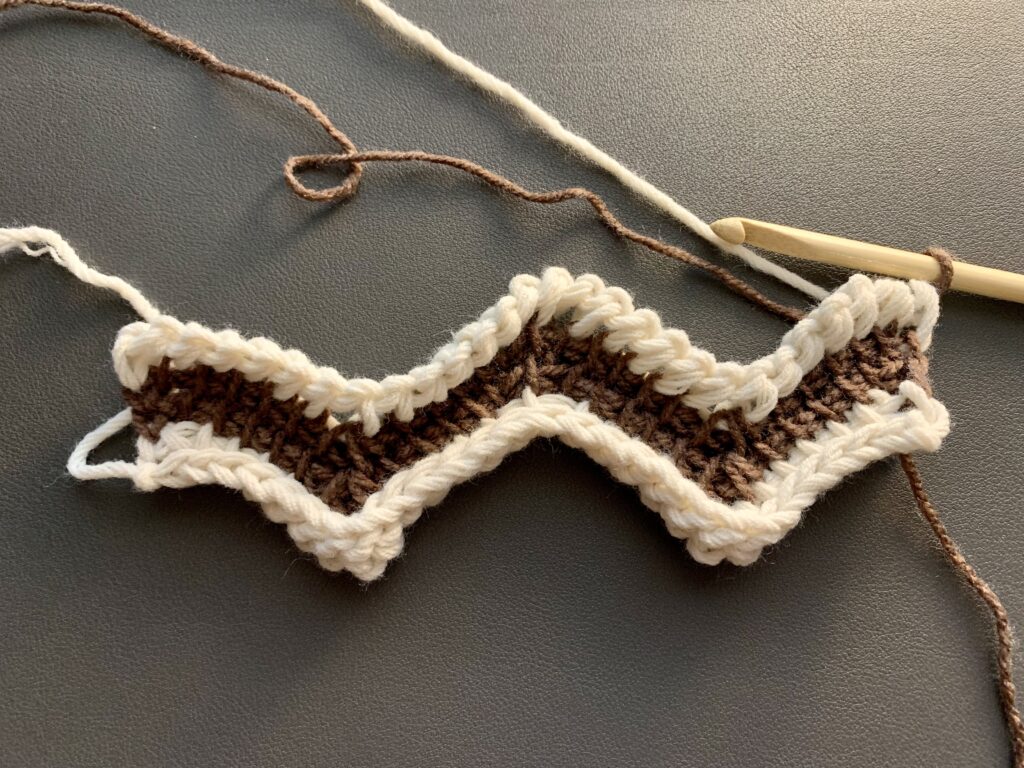
Those colors combined with the chevron pattern really make this blanket pop.
For the Tunisian chevron stitch, all you need to know is how to do the Tunisian simple stitch, the Tunisian simple stitch 3 together and how to yarn over.
I do have a video for this stitch, but I'm embarrassed to say it's pretty terrible. I haven't had a chance to reshoot it yet but it you'd like to squint your eyes and try to get past the blurriness of it, you can watch it here.
But for those of you who are good to go with photo tutorials, here you go!
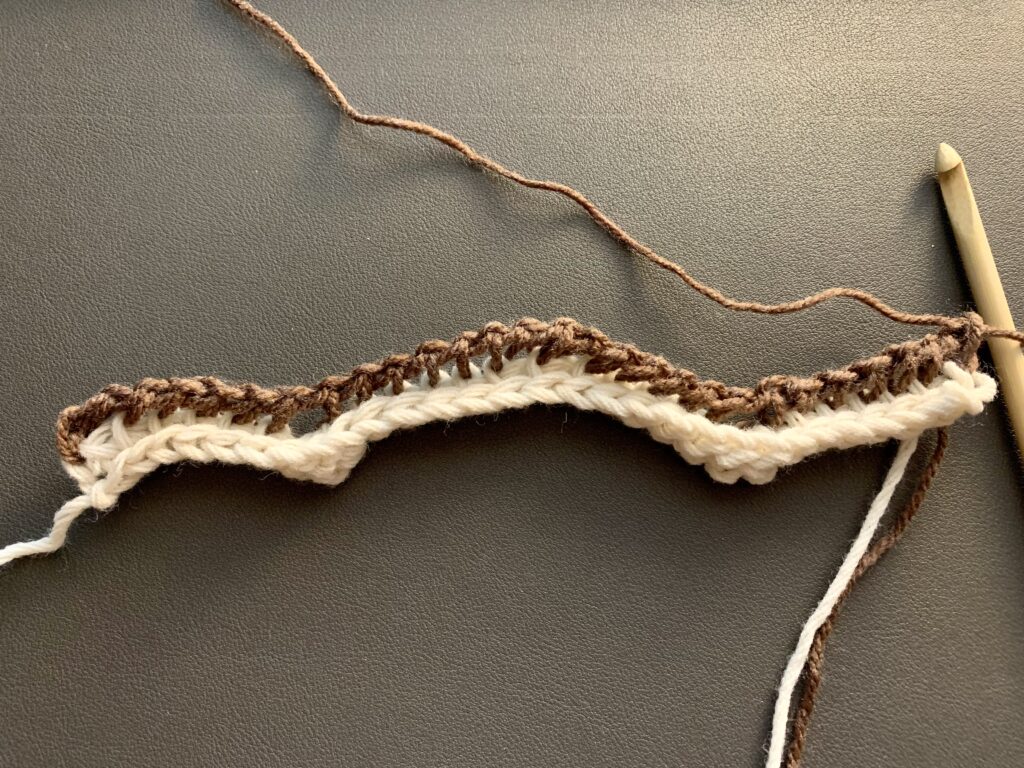
Tunisian Crochet Chevron Stitch How-To
Yarn A: Cream Color
Yarn B: Mandala
Stitch steps:
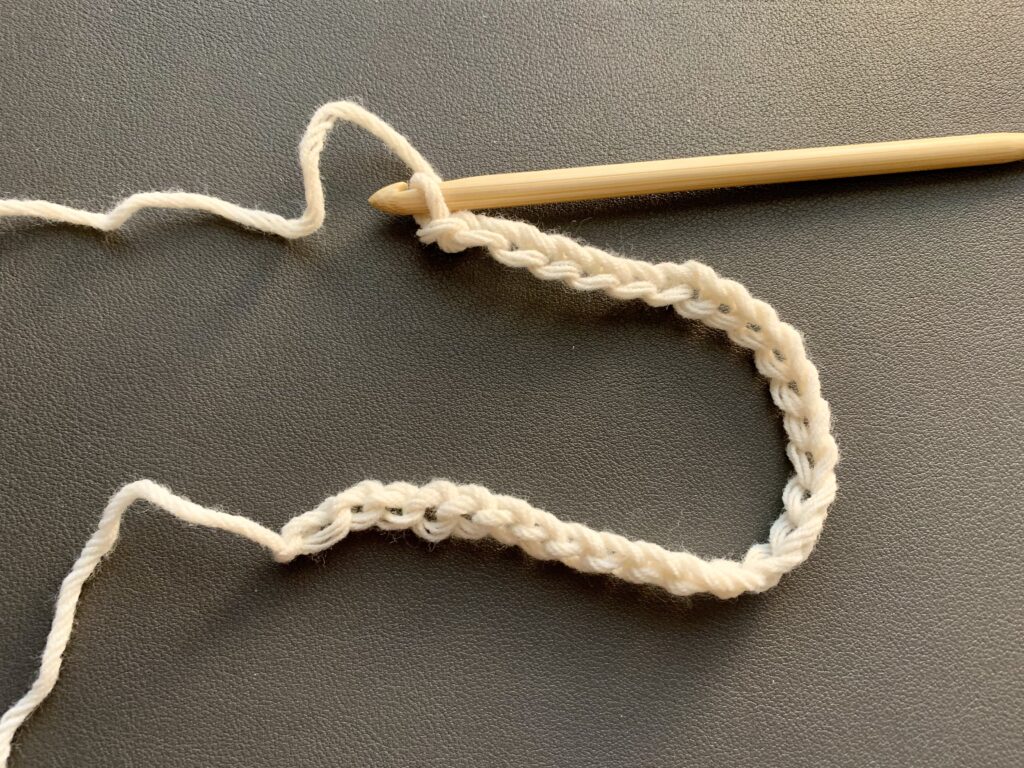
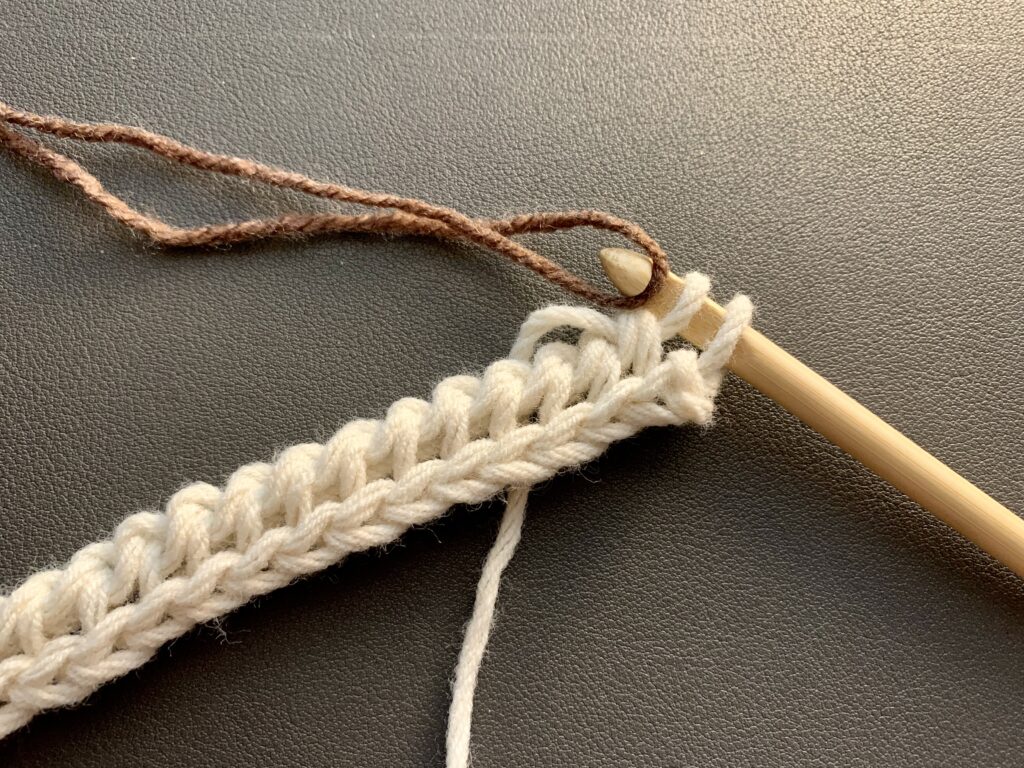
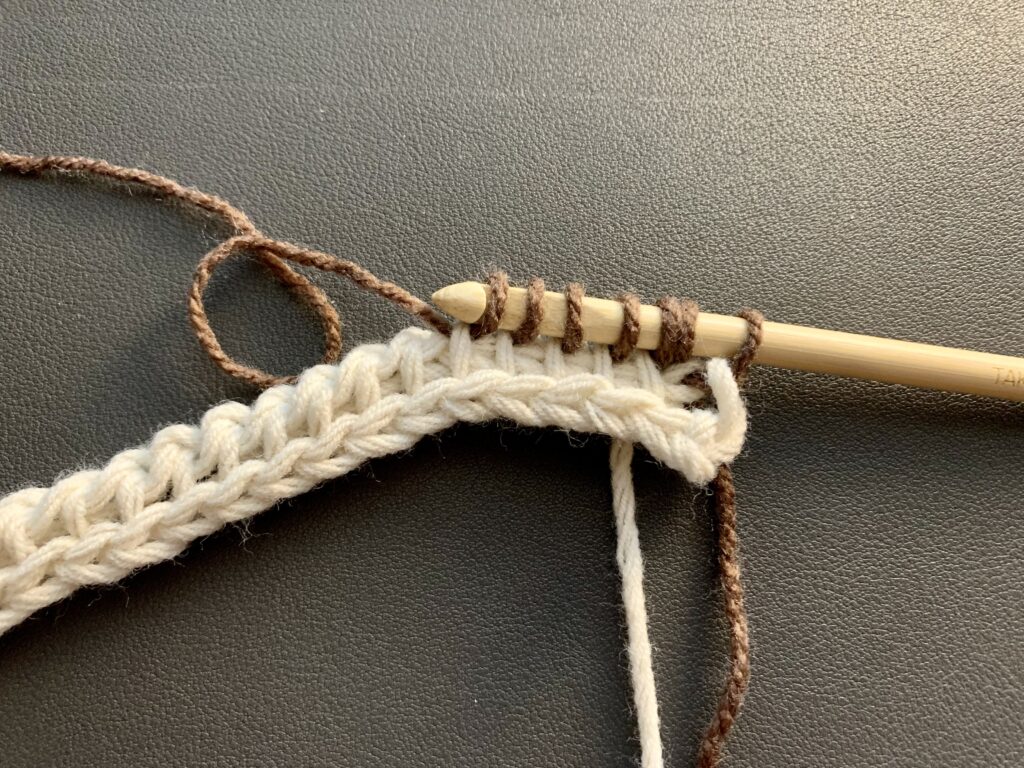
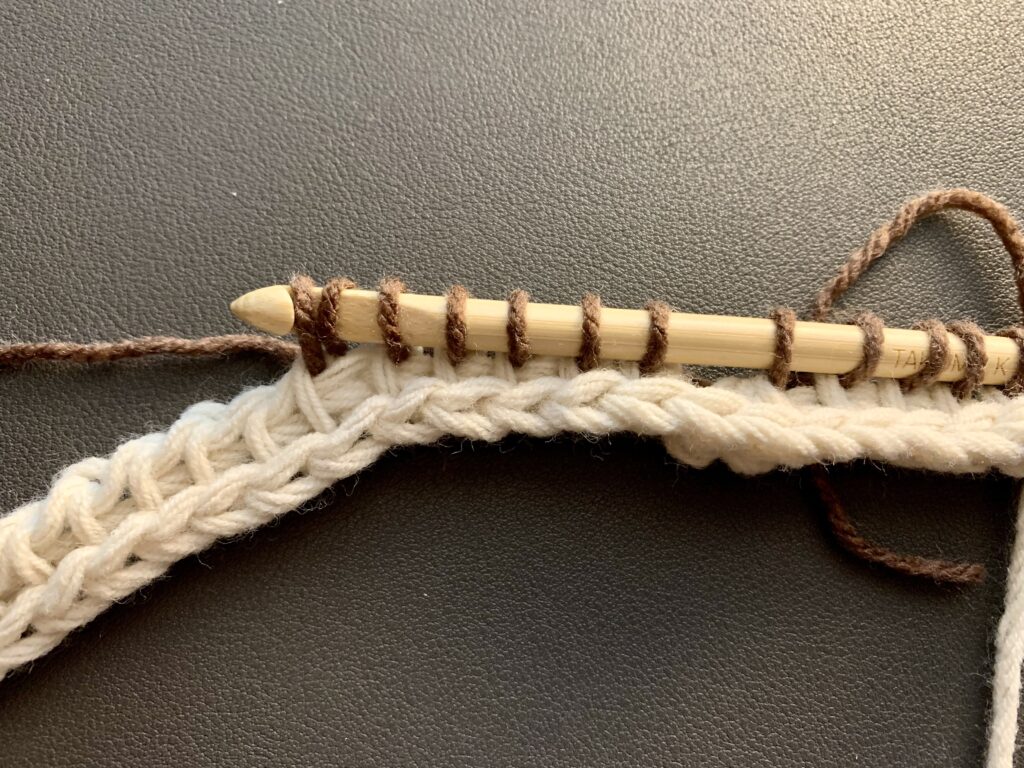
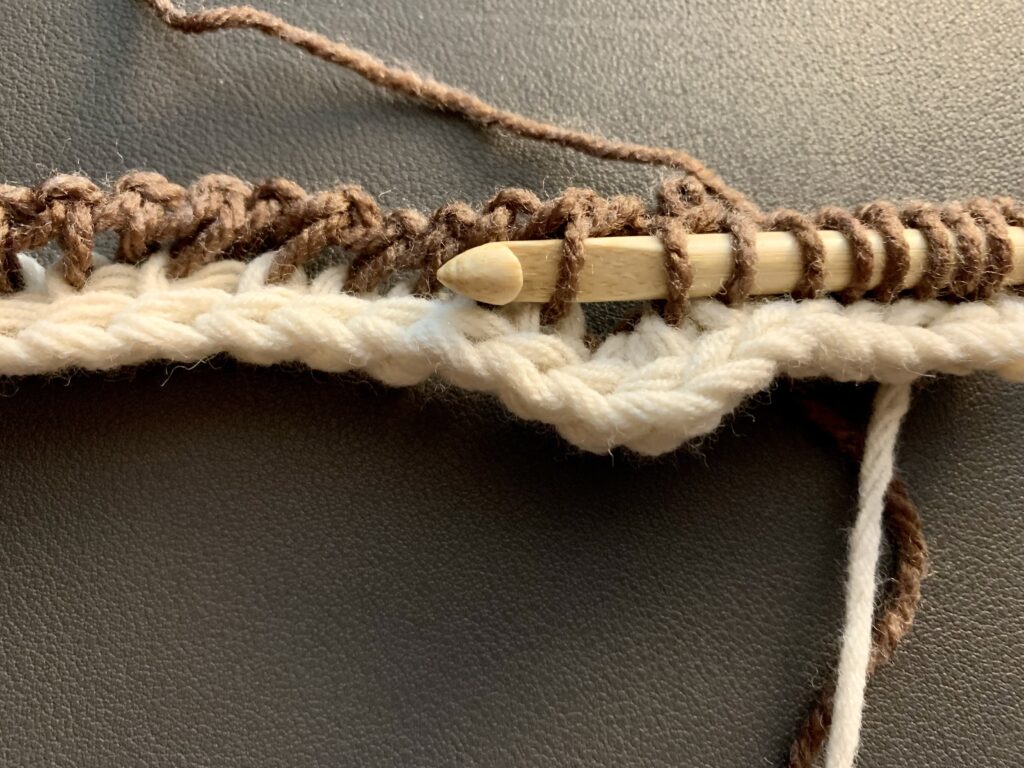
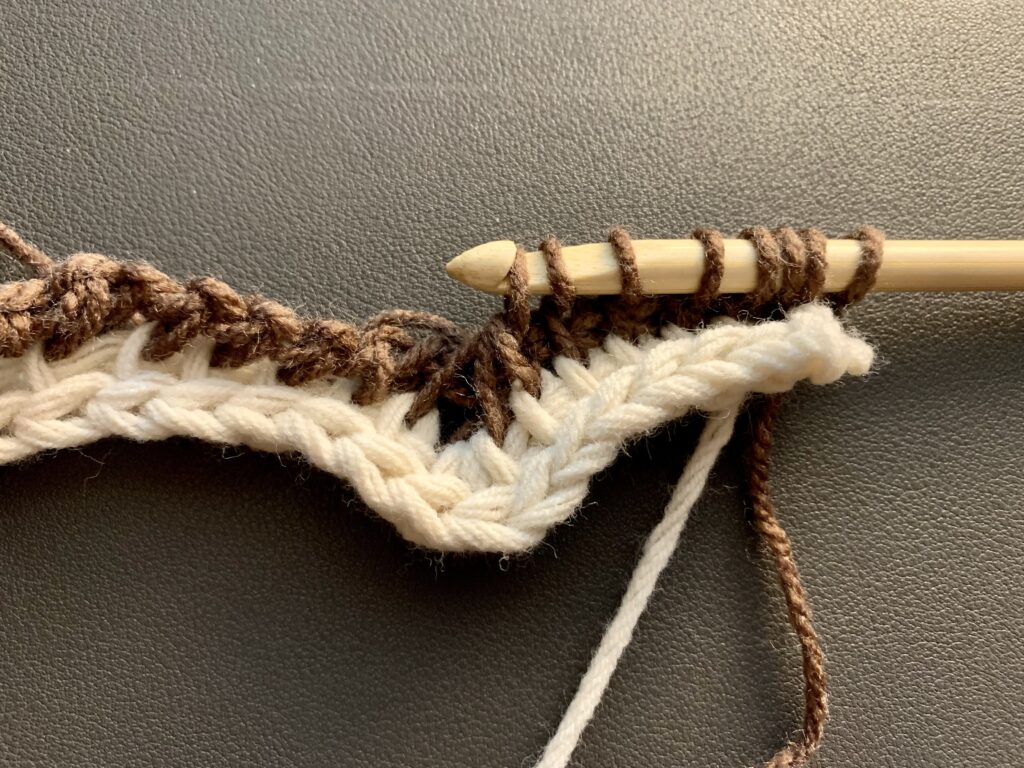
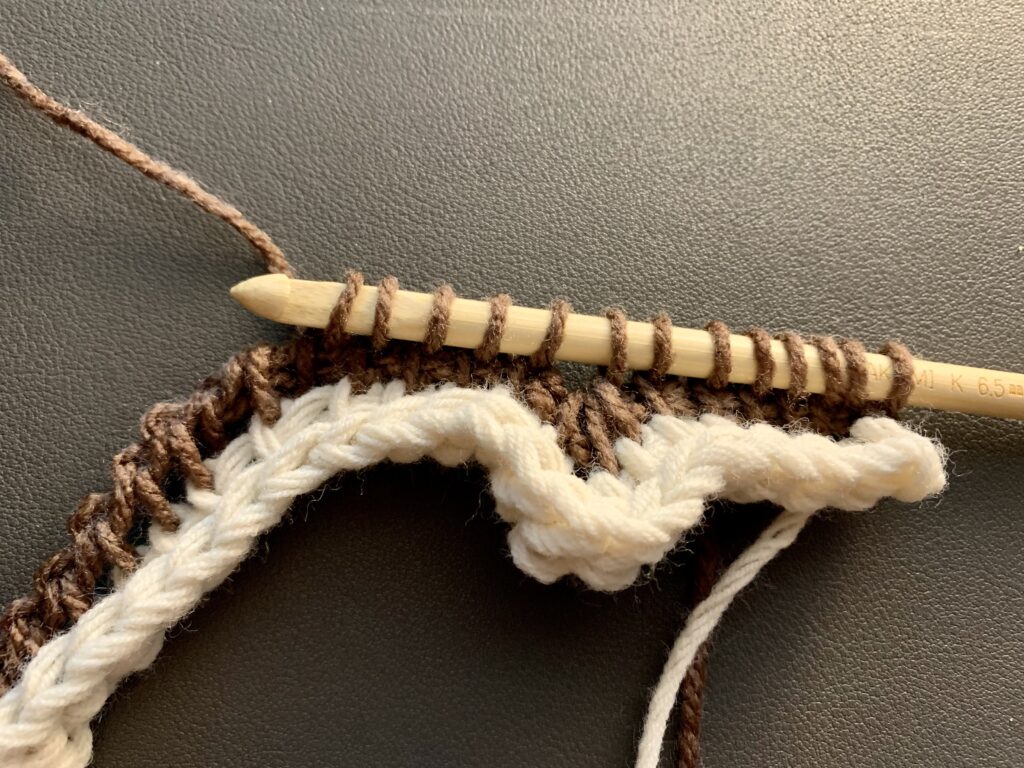
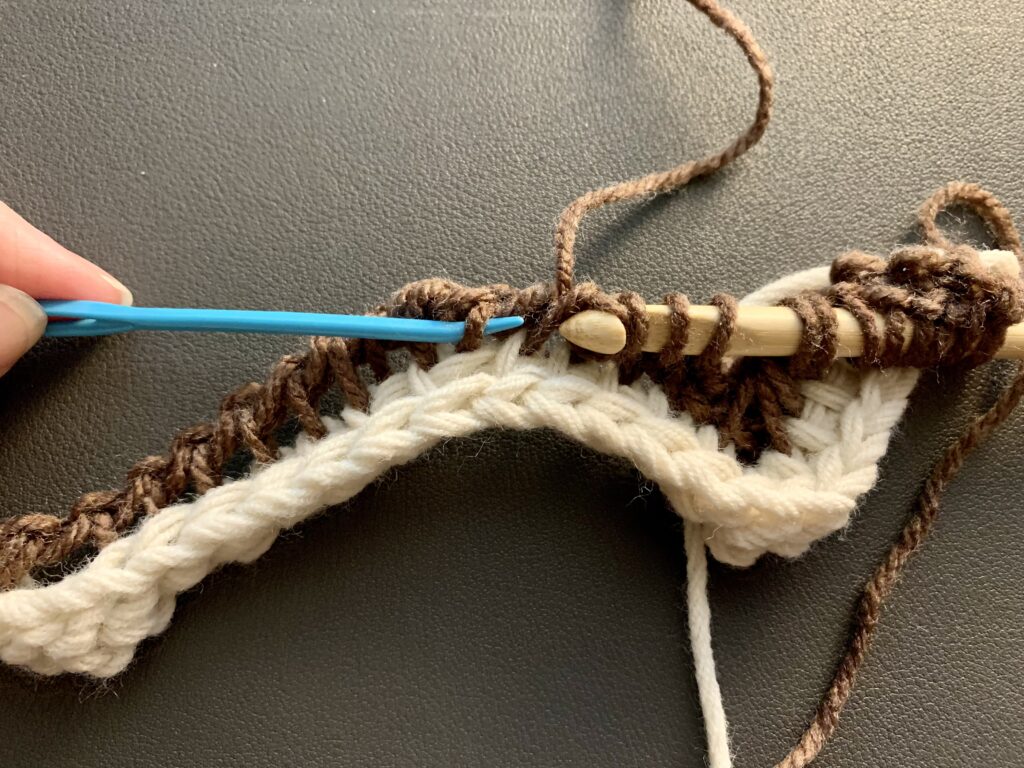
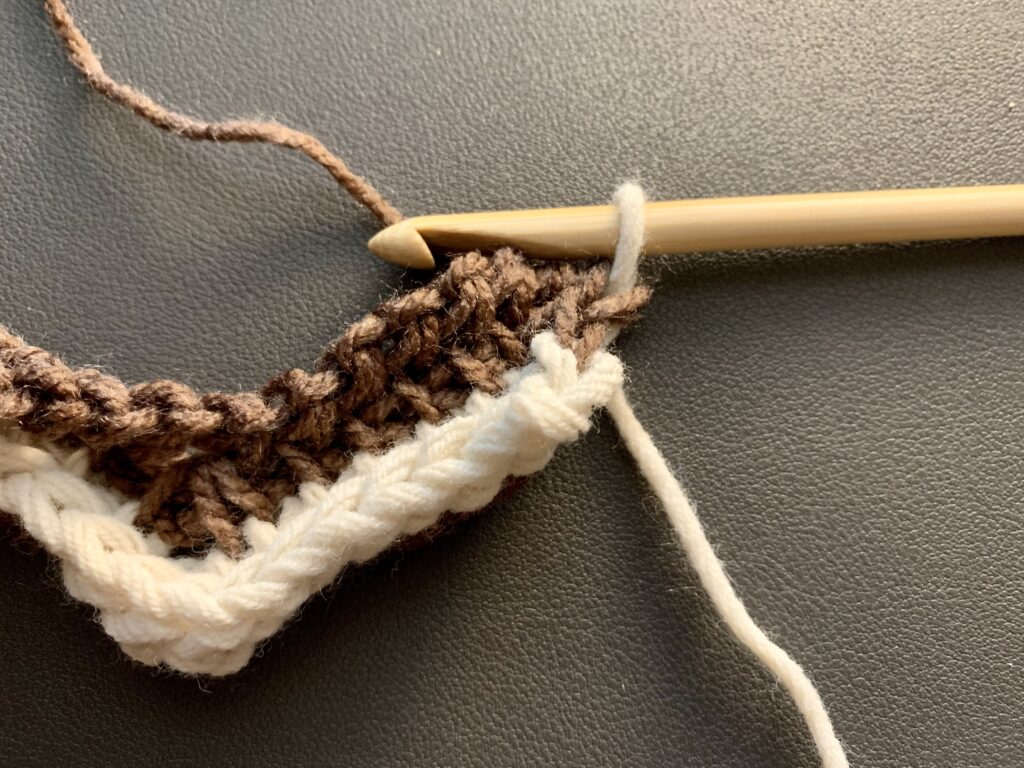
1. Yarn over (this creates your first increase) insert hook into next vertical bar, and pull up a loop
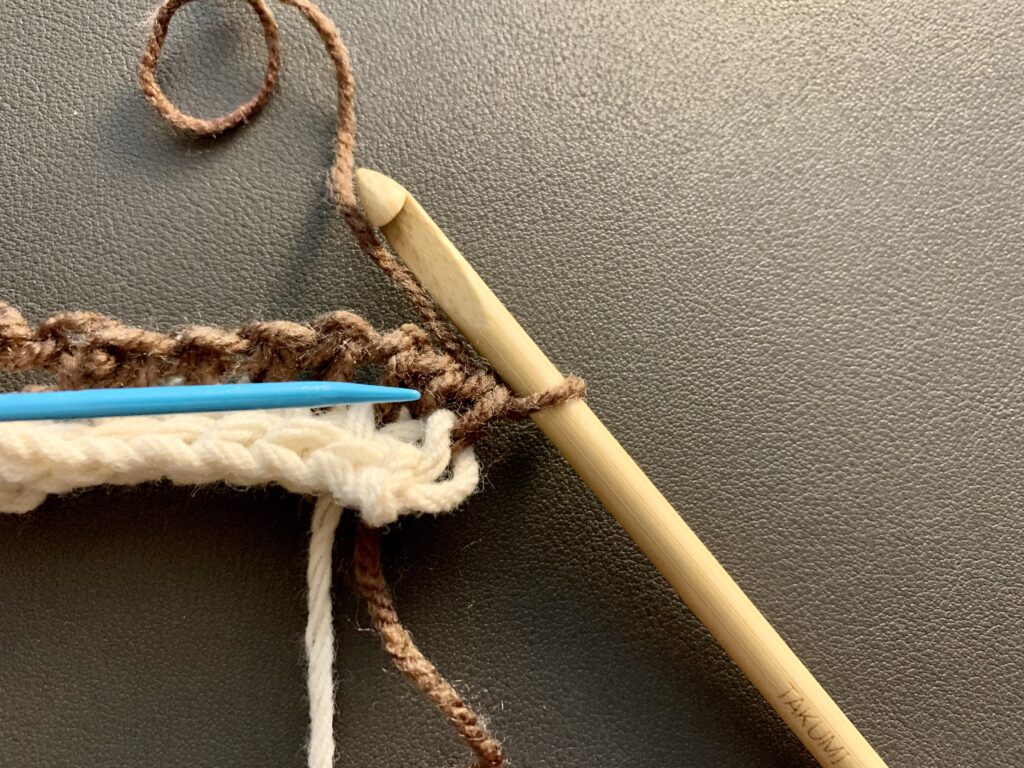
2. Pull up a loop in each of the next 4 vertical bars
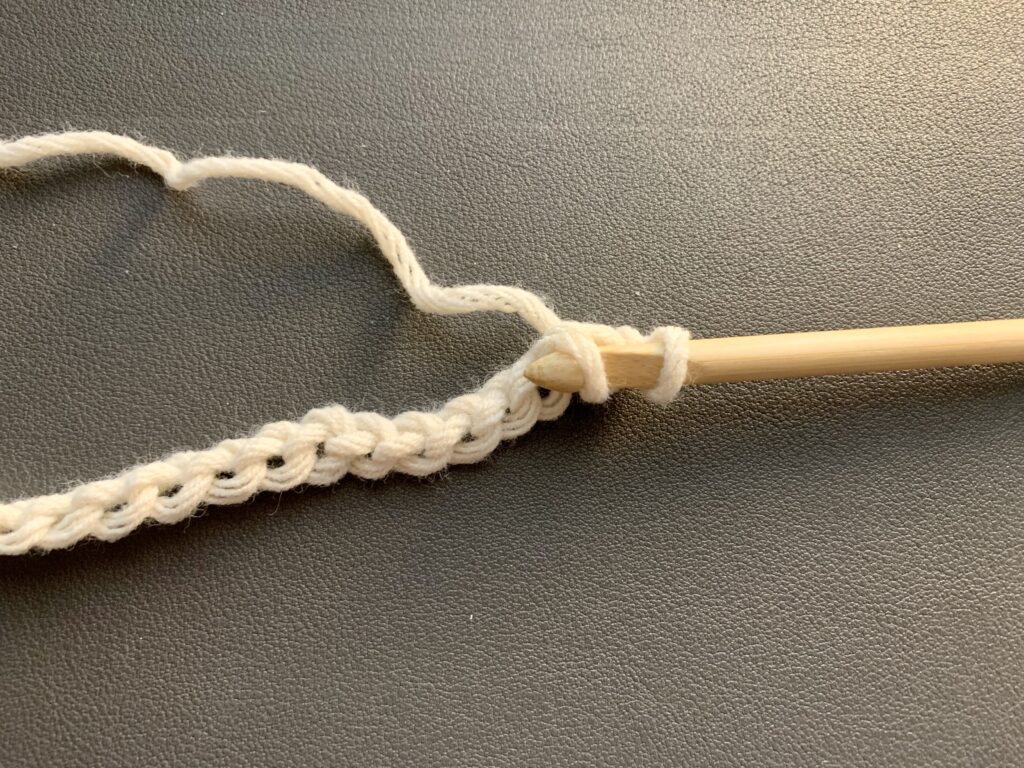
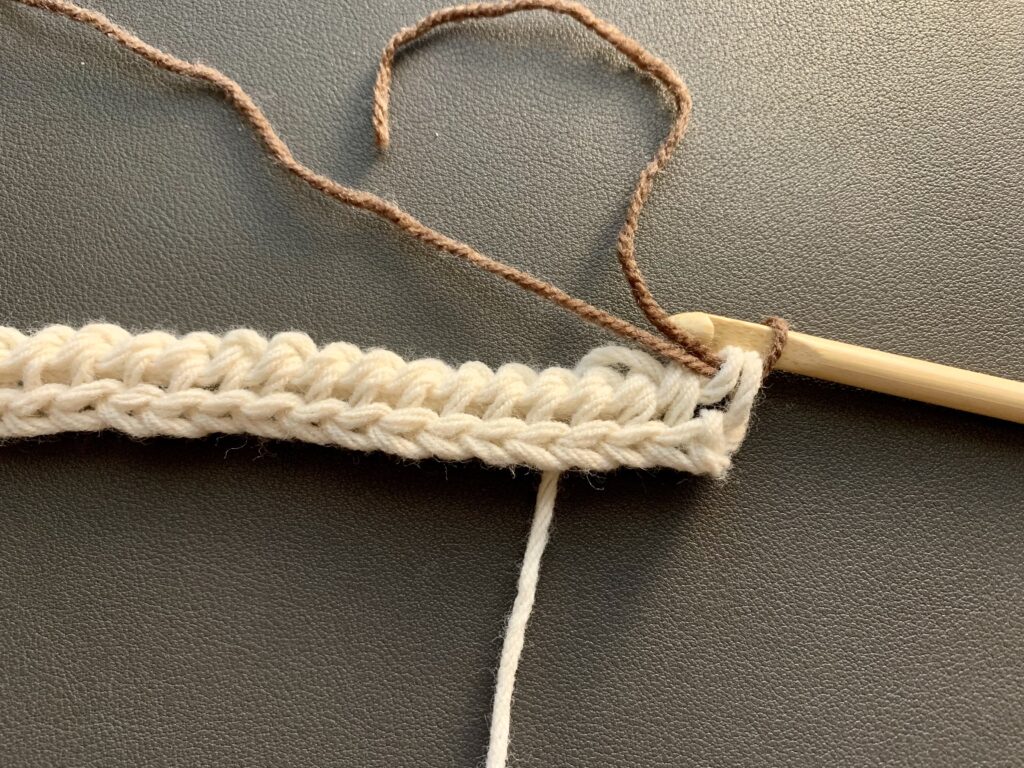
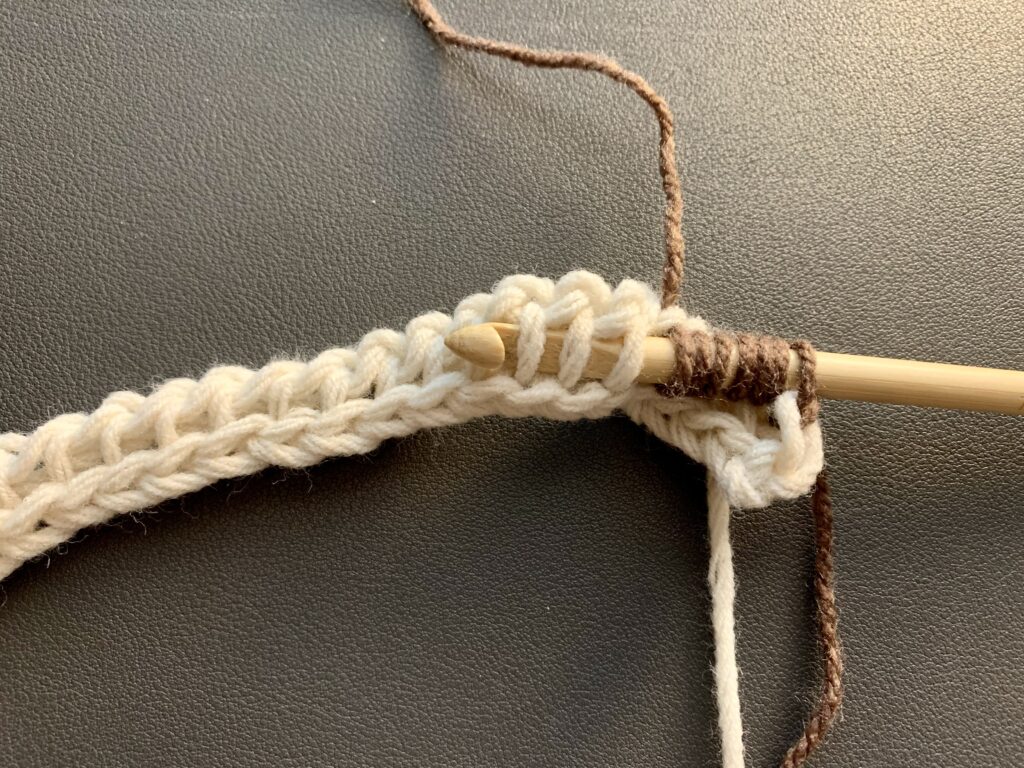
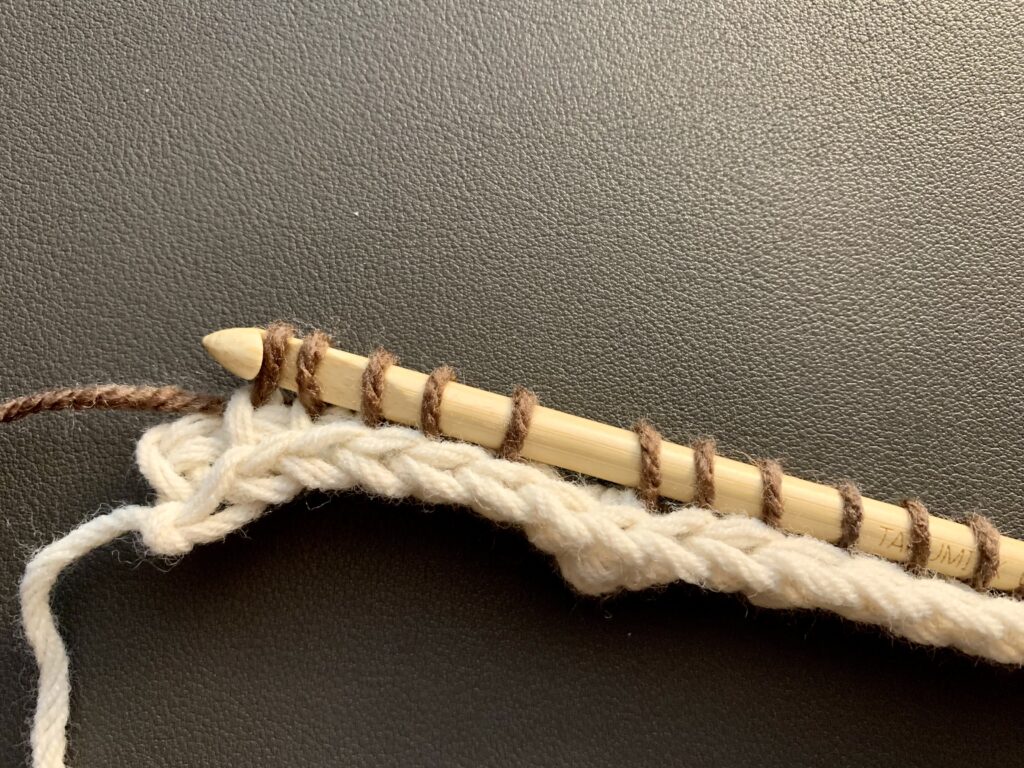
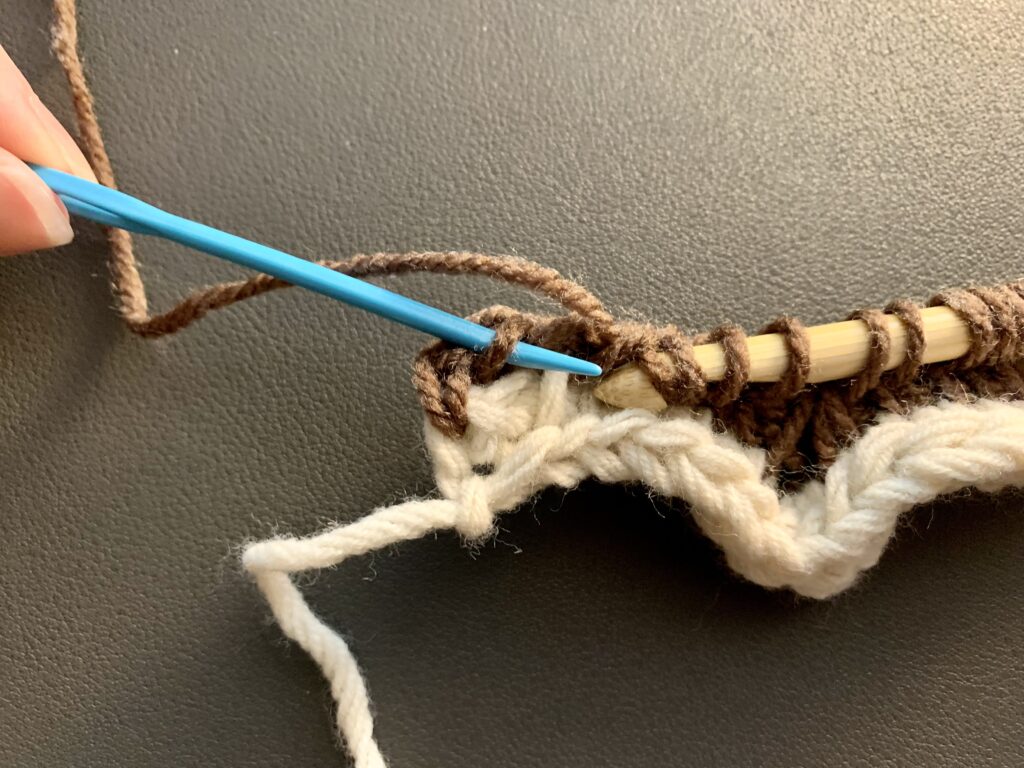
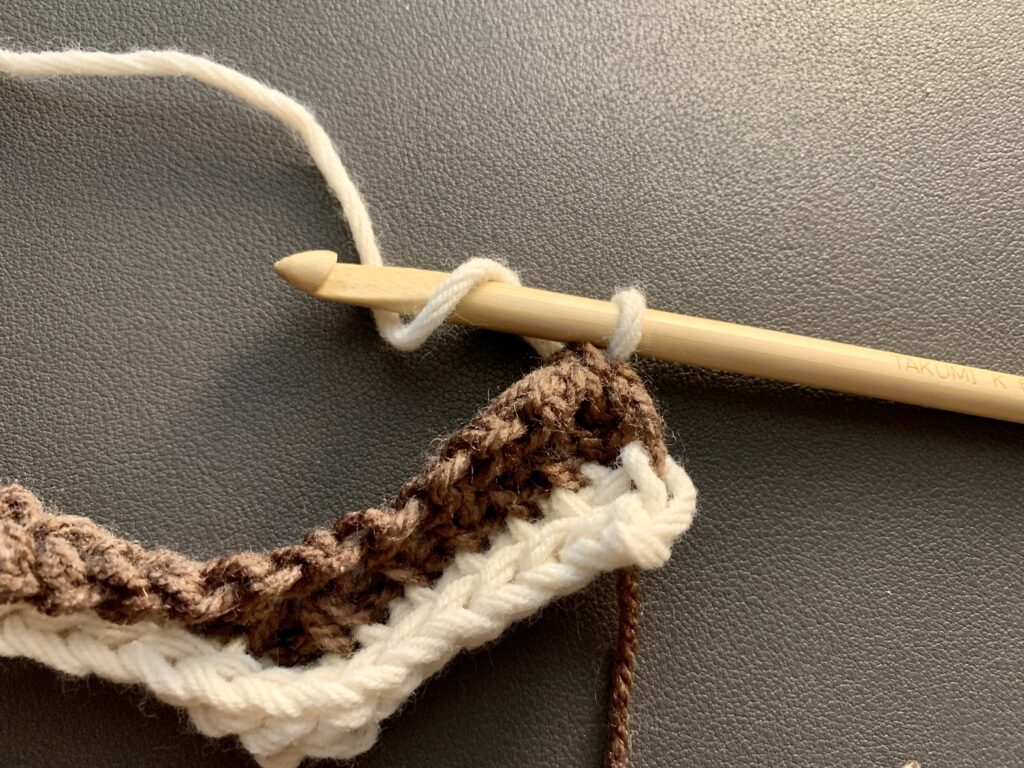
3. Insert hook under next 3 vertical bars and pull up a loop (this is called a Tunisian Simple Stitch three together, TSS3tog is the abbreviation)
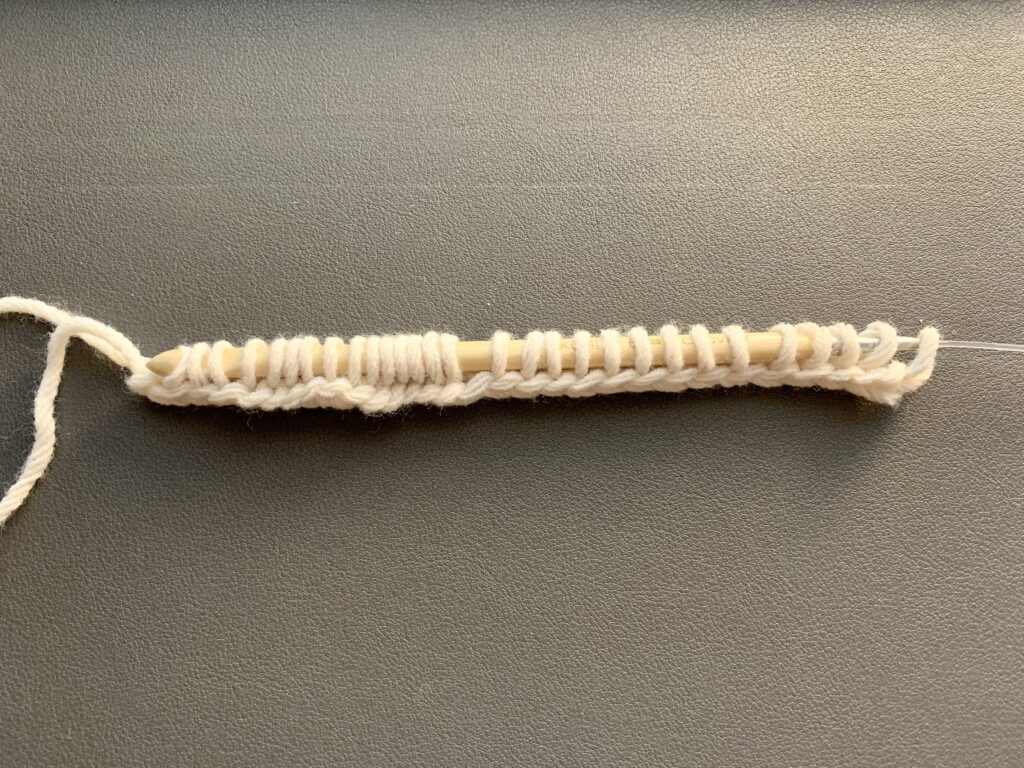
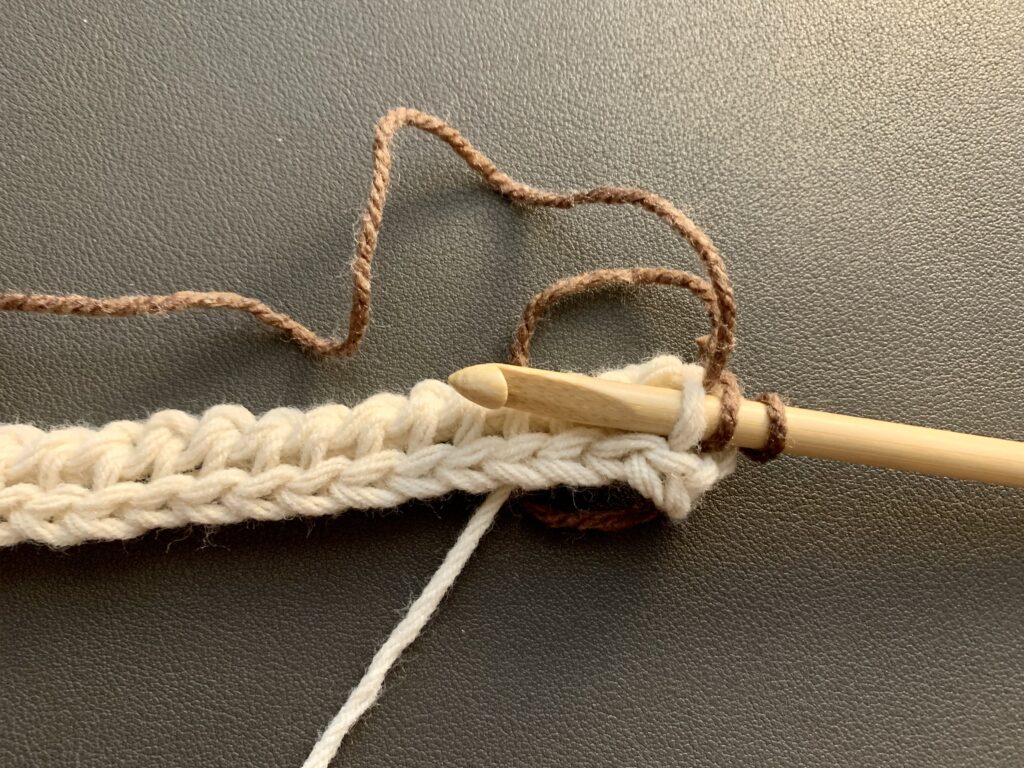
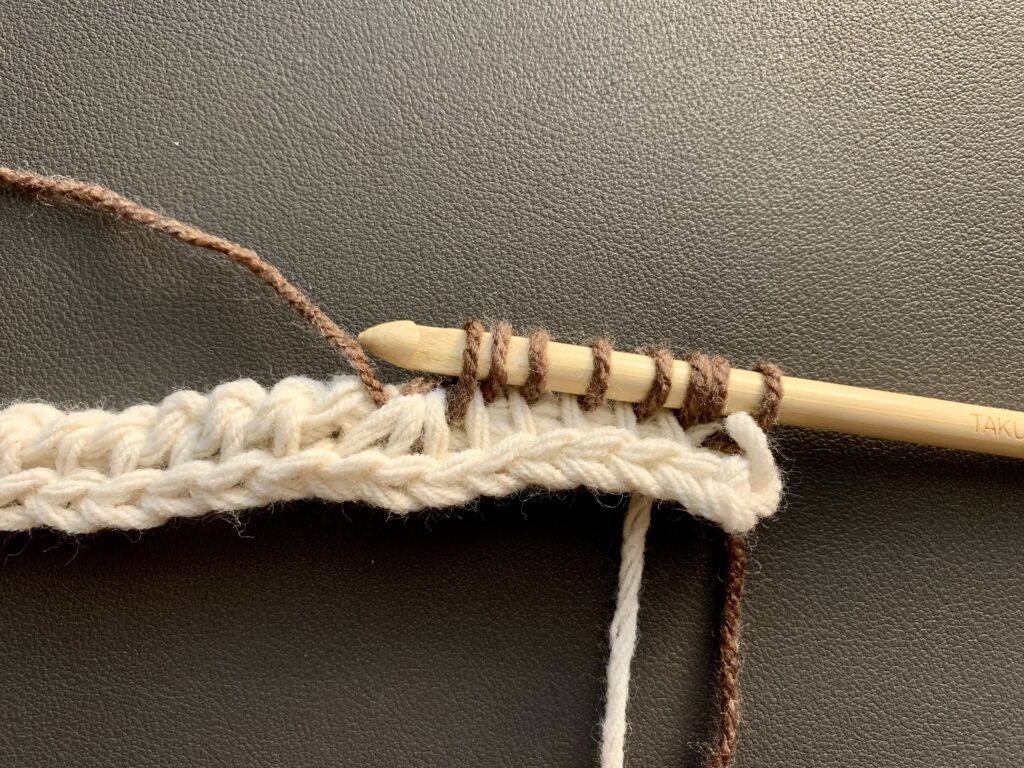
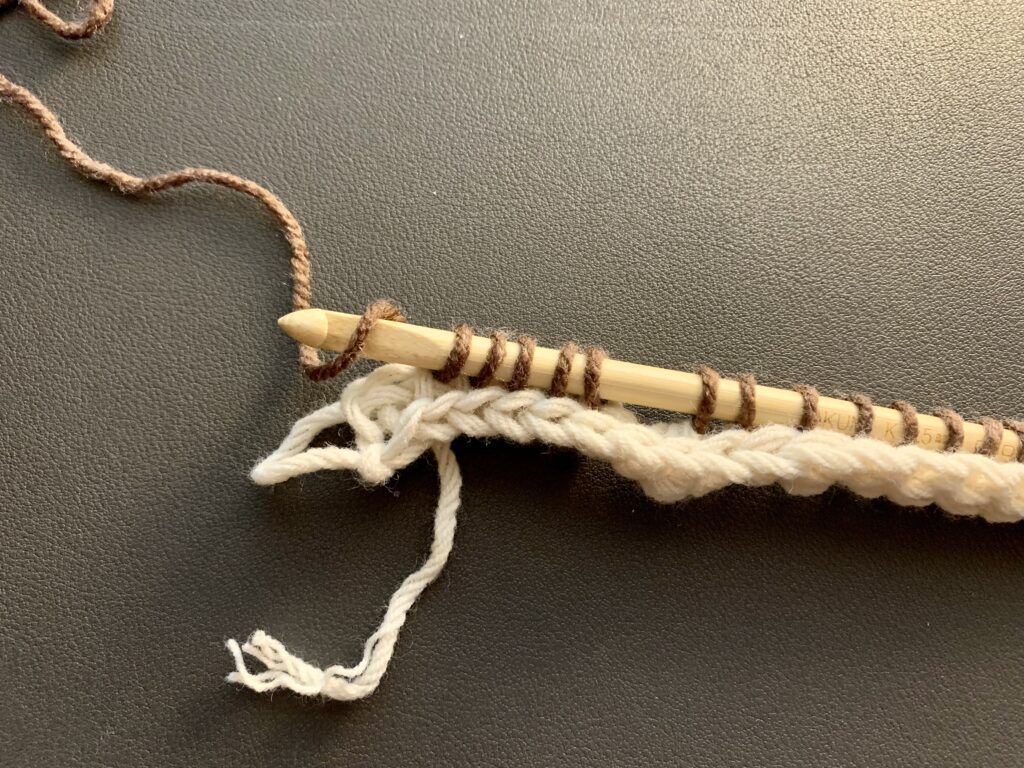
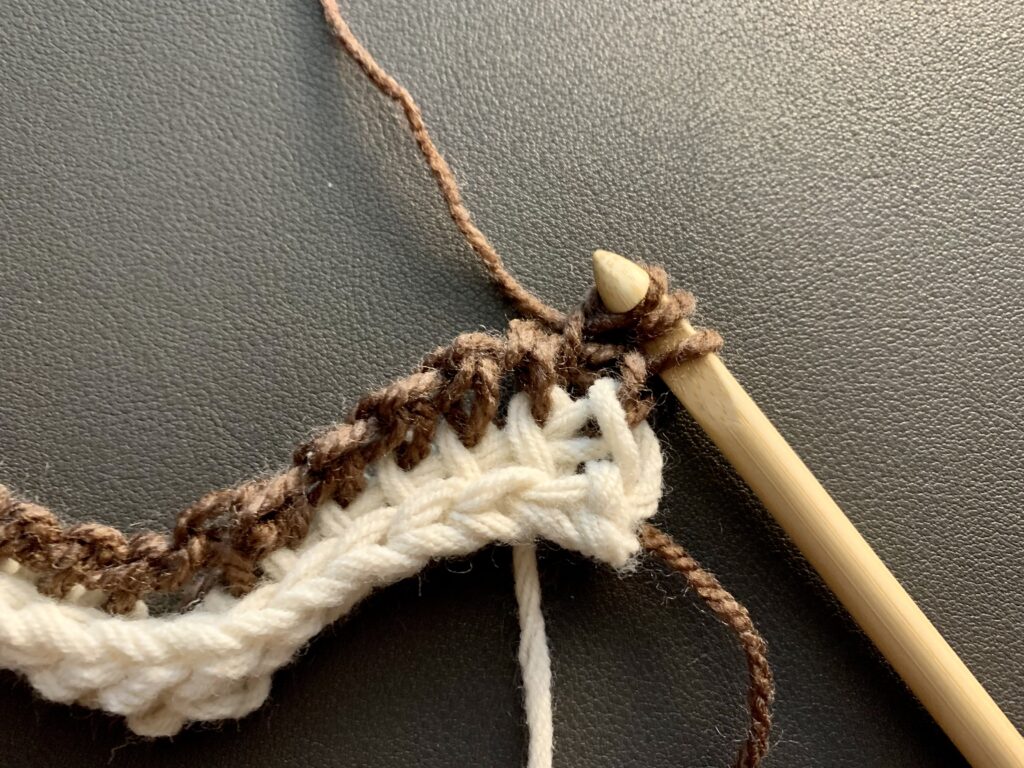
4. Pull up a loop in each of the next 5 vertical bars
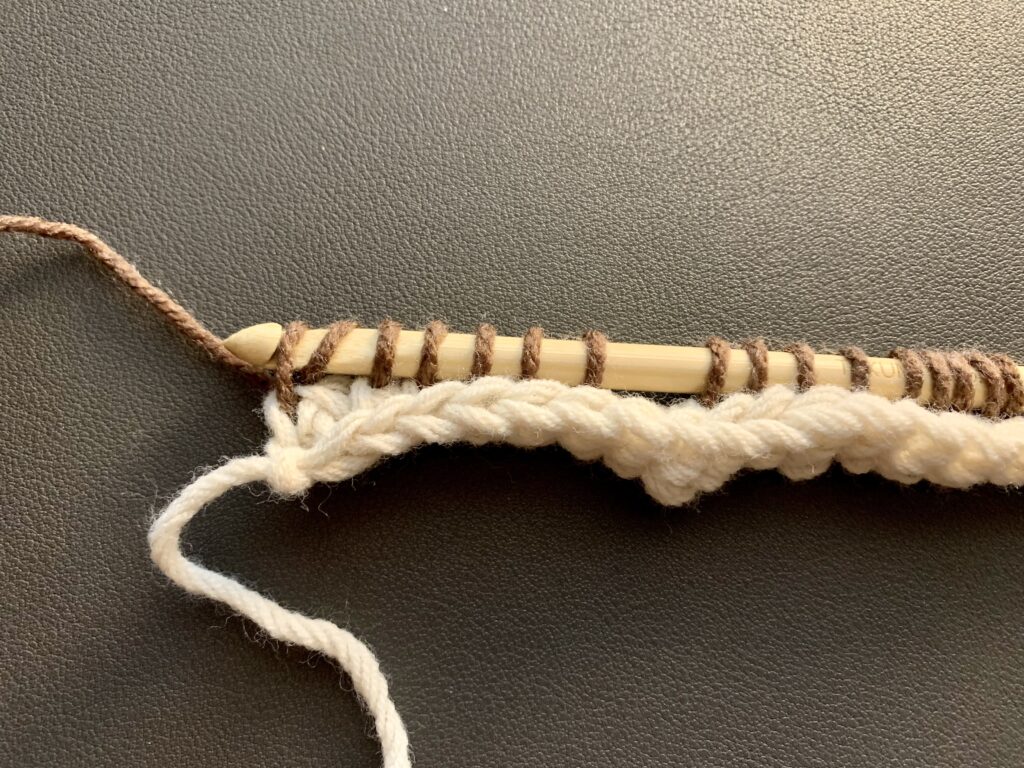
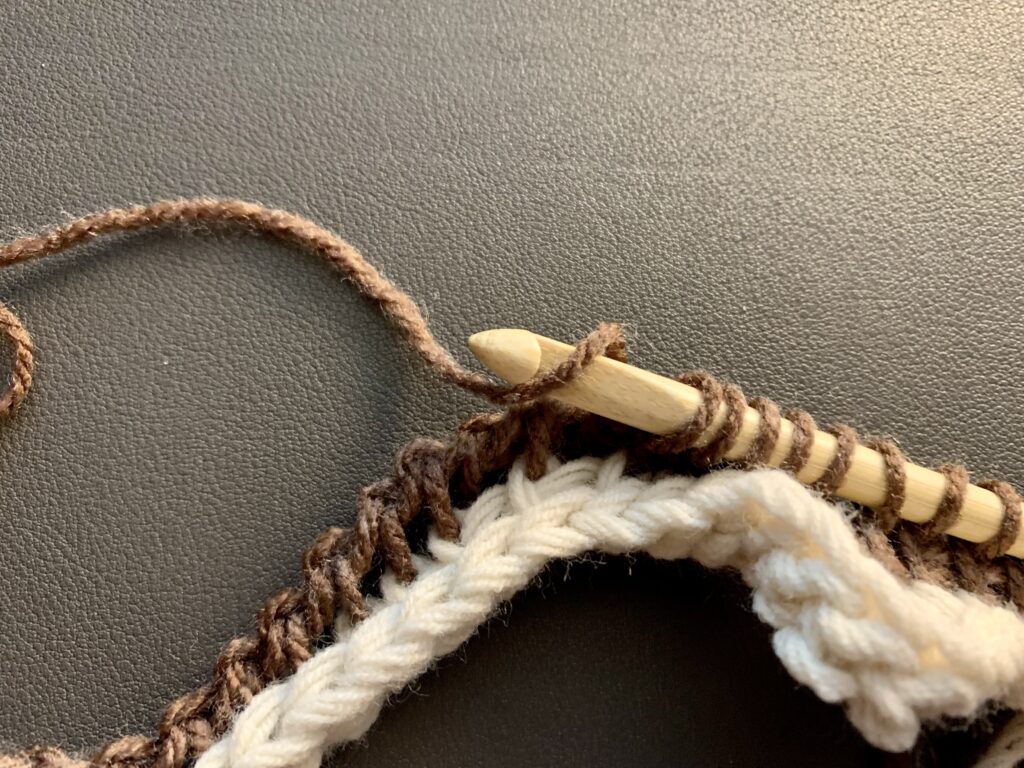
5. Yarn over (this is your second increase) and pull up a loop in the next vertical bar
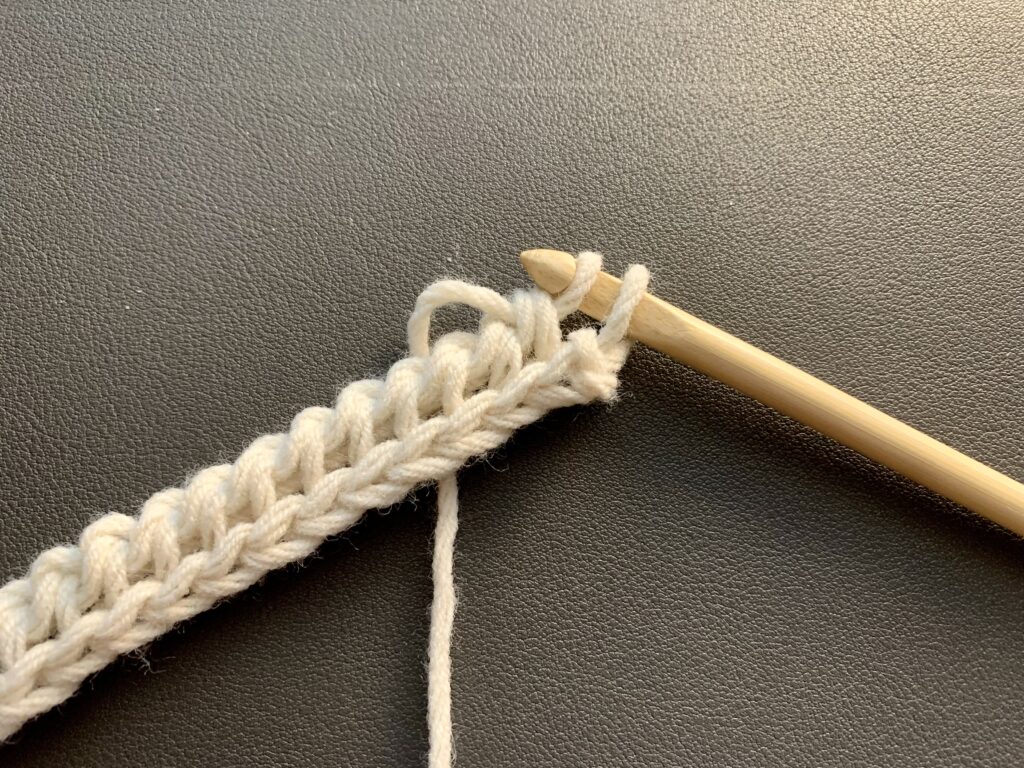
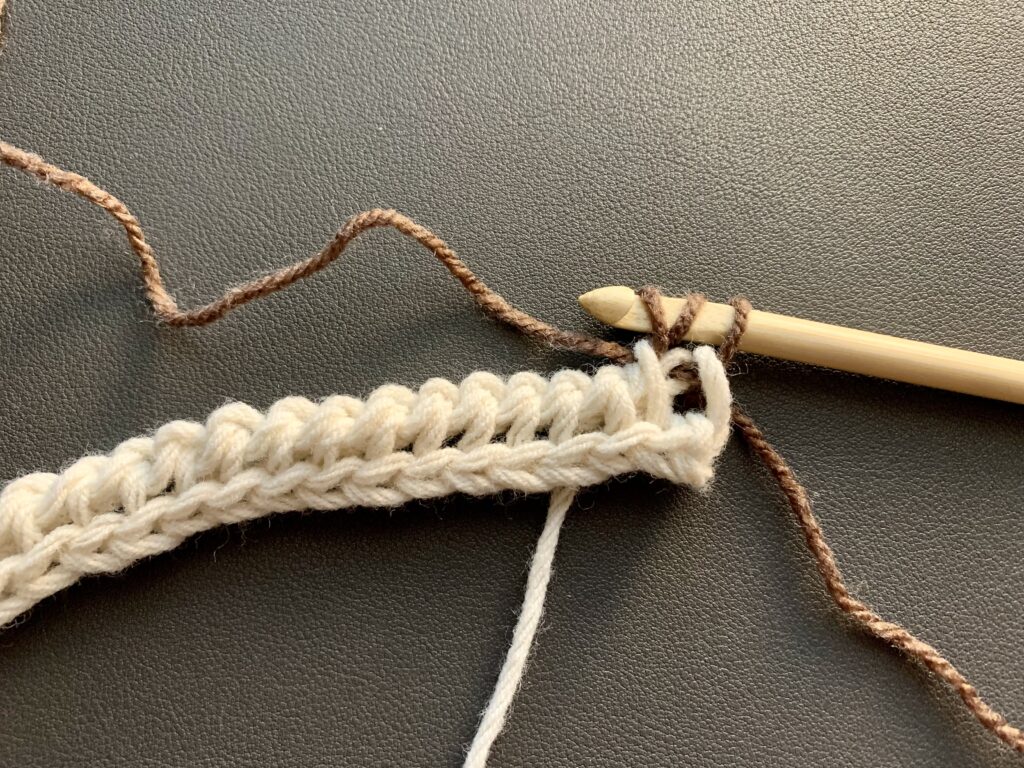
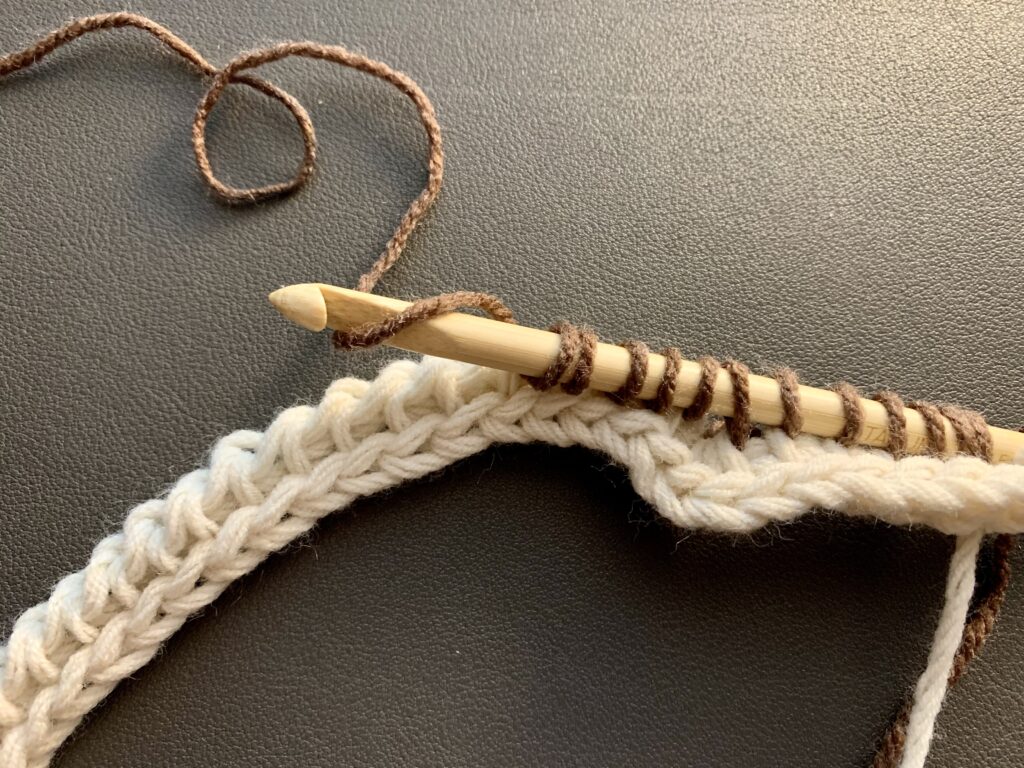
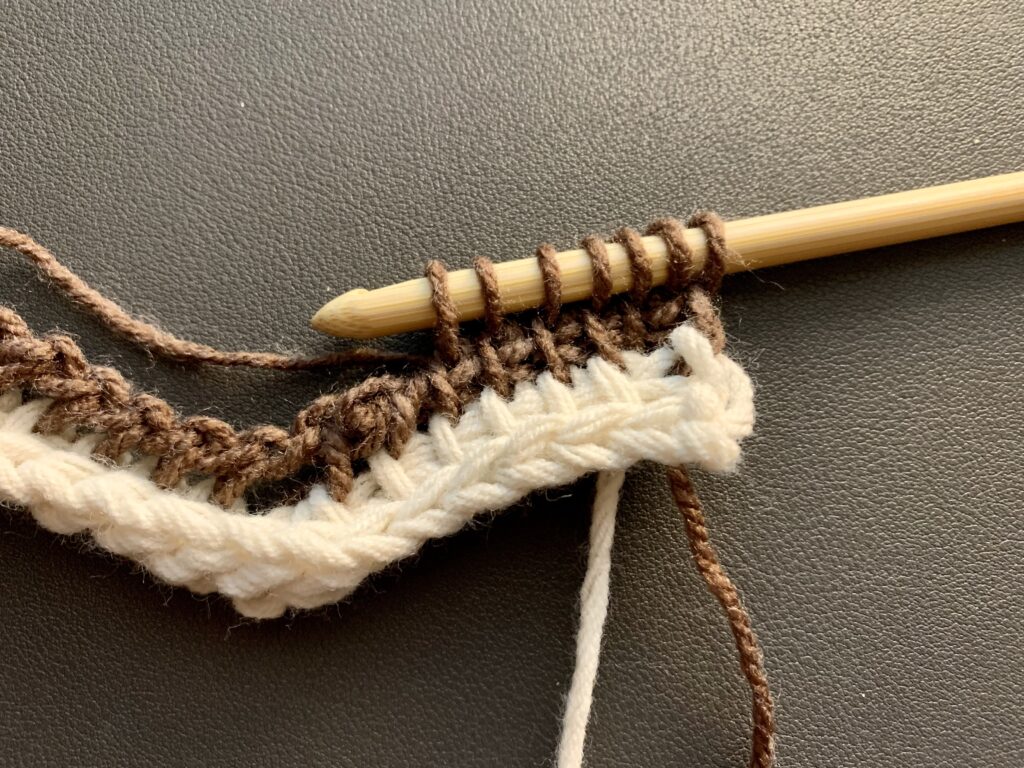
Continue steps 1 - 5 until you reach the end of the row, which is the edge stitch.
6. Yarn over, work the last st as for Lts, RetP


The Yarn
As mentioned, I combined two different types of yarn for this pattern, which has been pretty common for me when it comes to designing a pattern with self-striping yarn.
I've linked to quite a few of the patterns in this self-striping yarn round-up post.
When Lion Brand released this line of limited edition premium yarns and put it on sale, I grabbed a ton of neutrals. You can still snatch some up or if you'd like a substitute for it, their Pound of Love yarn would be perfect.
Basically, you need a weight 4 yarn. You can check out www.yarnsub.com if you need more recommendations.
Since I was going for the rainbow effect, I chose Mandala yarn in Chimera, which you can check out here.
I do think any of the Mandala yarn colorways would look fantastic. I'm actually in the process of making one of these blankets with Warlock; one of my favorite Manadala colors.
I'll share a picture on our Facebook and Instagram when I'm done.
A Note About Deconstructing Self-Striping Yarn
In this post, I talk about how to have more control over the color changes when it comes to using self-striping yarn. Some makers don't like using this yarn because they want to be able to control the stripes a little better.
I totally get that.
For this pattern, since I wanted the rainbow colors to flow more evenly, I did a little reconstructing.
What does this mean?
It means you cut out part of the yarn in order to get to the color you want.
So, if the next Mandala cake didn't start with the right color, I cut out part of the yarn until I reached the color I wanted. Then, I attached the color(s) I cut out to the end of that cake.
Ok, enough chit-chat. Are you ready for the pattern?
The Pattern
Purchase a printable version of this pattern on my shop here or Etsy here.
Description:
The Rainbow blanket is made with the Tunisian Chevron Stitch and two different kinds of yarn. By using self-striping yarn, the ease of color changes is done for you. Once you get the hang of the stitch, this makes for one meditative and relaxing crochet project.
Notes:
- Finished size measures 42 ½" wide x 57 ½″ long
- Change yarn when you have two loops left on your hook at the end of the Return Pass
- You are crocheting one row with the cream yarn (Yarn A) and 2 rows with the Mandala (Yarn B); when switching colors, you do not fasten off, and instead, carry up the yarn
- To change size of blanket lengthwise, add more rows
- To change width of blanket, chain a multiple of 14 + 1
- In order for the rainbow colors to flow, I ended up deconstructing the Mandala yarn; to learn what that means, read the section in this post titled "How to Have More Control of the Color Changes"
Materials:
HOOK(S)
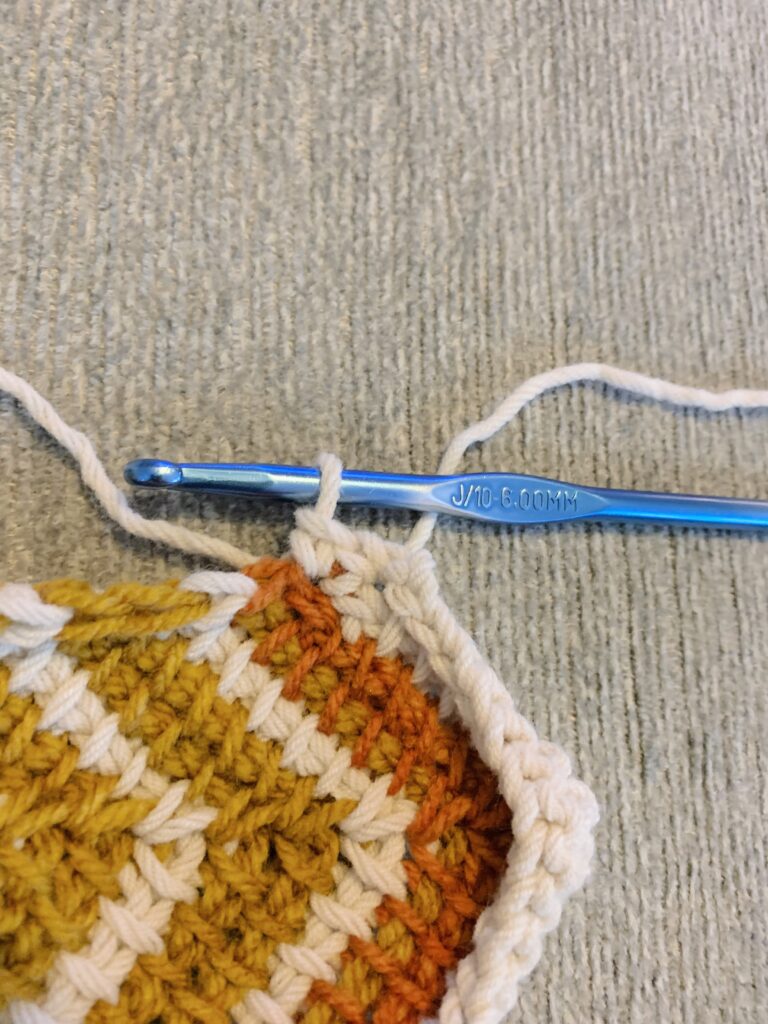
6.5 mm Tunisian crochet hook with 32" cable (like this one)
6.0 mm regular crochet hook (for border)
YARN
Weight 4 • approx. 930 yds
Lion Brand Limited Edition Premium, 5 skeins
Color: Neutrals
Purchase HERE
Weight 3 • approx. 1,770 yds
Lion Brand Mandala, 3 cakes
Color: Chimera
Purchase HERE
NOTIONS
Scissors
Tapestry needle
GAUGE
2 pattern repeats wide = 5 ½″; 4″ = 10 rows long
Abbreviations:
ch chain
rep repeat
FwP forward pass
RetP return pass
Lts last Tunisian stitch
Tss Tunisian simple stitch
Tss3tog Tunisian simple stitch three together
yo yarn over
sc single crochet
slst slip stitch
st(s) stitch(es)
Special Stitches:
Tss3tog
Insert hook under next 3 vertical bars, yo and draw up loop through all 3 loops. (Decreases by 2 sts)
Lts
insert hook under both vertical bars of the last stitch and complete as for Tunisian simple stitch
RetP
ch 1, (yo, pull through the next 2 loops) until only one loop remains on the hook
The Pattern:
Yarn A: Cream Yarn
Yarn B: Mandala
Foundation row With Yarn A, Ch 197
Row 1 (yarn A)
Pull up a loop in the back bump of the 2nd ch from hook and each remaining ch, RetP. (197 loops on hook)
Switch to yarn B when you have two loops left on hook on RetP
Row 2 (yarn B)
1. Yarn over (this creates your first increase) insert hook into next vertical bar, and pull up a loop
2. Pull up a loop in each of the next 4 vertical bars
3. Insert hook under next 3 vertical bars and pull up a loop (this is called a Tunisian Simple Stitch three together, TSS3tog is the abbreviation)
4. Pull up a loop in each of the next 5 vertical bars
5. Yarn over (this is your second increase) and pull up a loop in the next vertical bar
Continue steps 1 - 5 until you reach the end of the row, which is the edge stitch.
6. Yarn over, work the last st as for Lts, RetP
Row 3 (yarn B)
Repeat steps from Row 2
Switch to yarn A when you have two loops left on hook on RetP
Row 4 (yarn A)
Repeat steps from Row 2
Rows 5 - 154
Repeat Rows 2 - 4; making sure to end on a yarn A row
Last row (yarn A)
sl st in each vertical bar across row to bind off, inserting hook as for Lts on the last st.
Fasten off. Weave in all ends.
Continue to border instructions
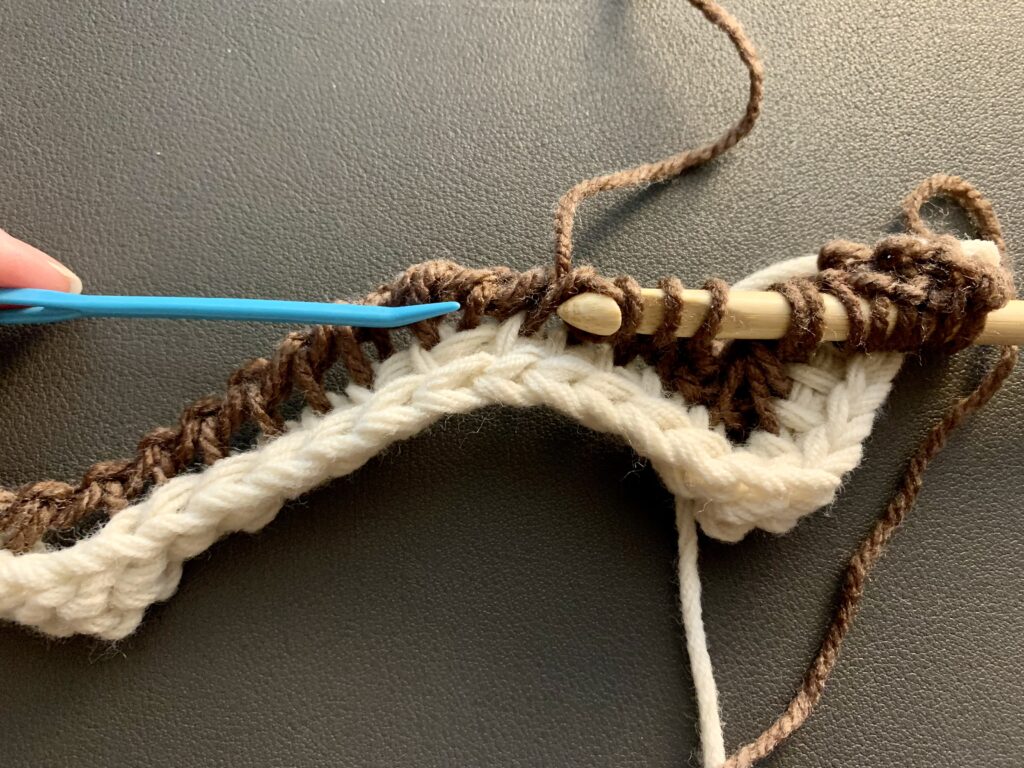
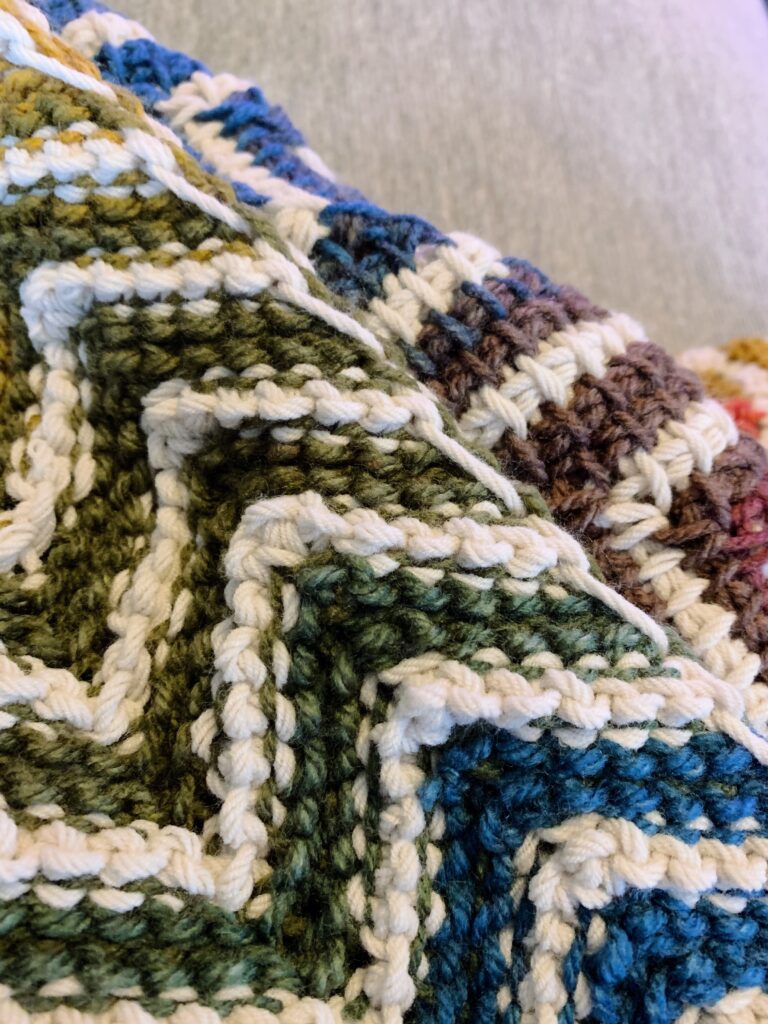
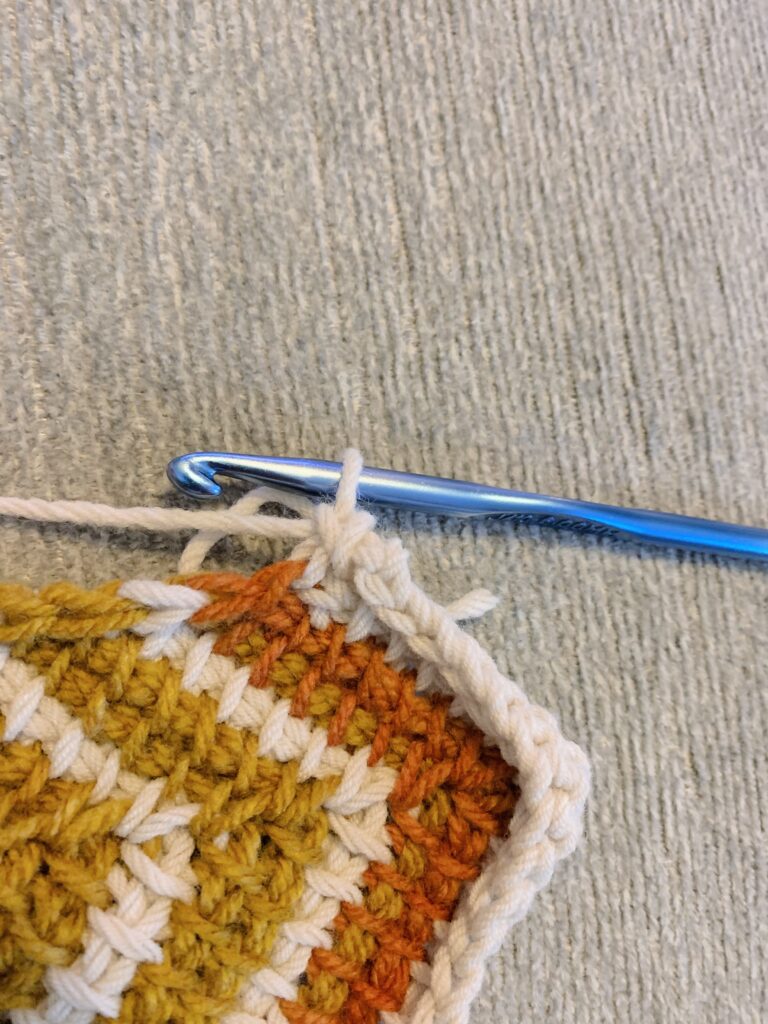
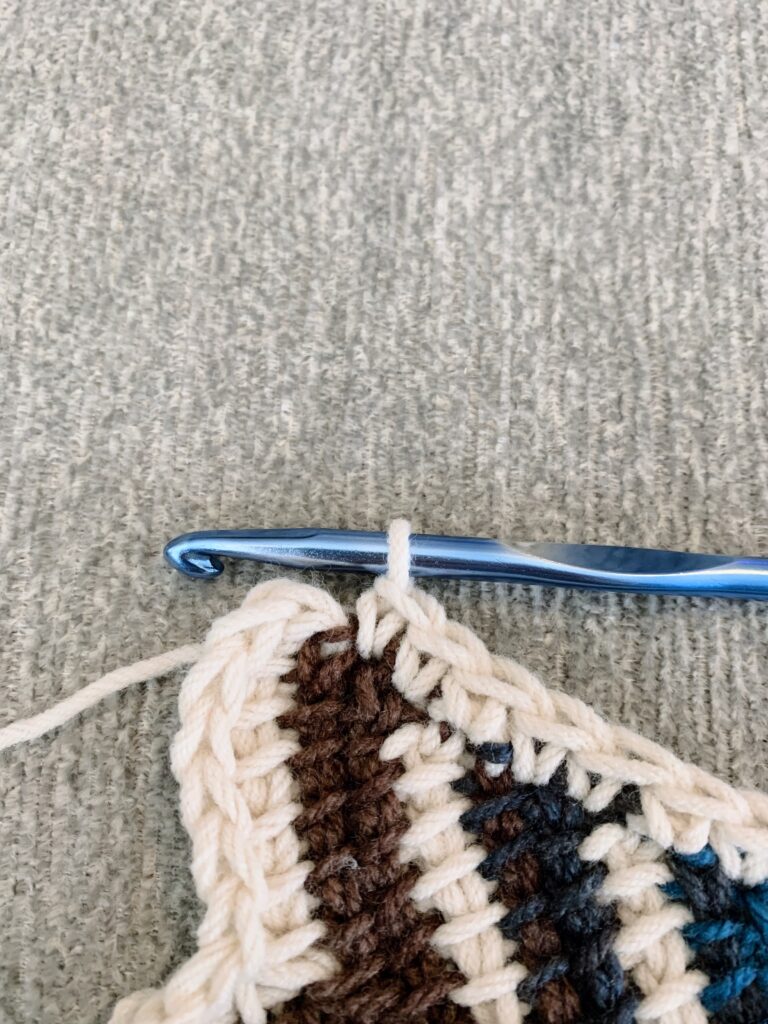
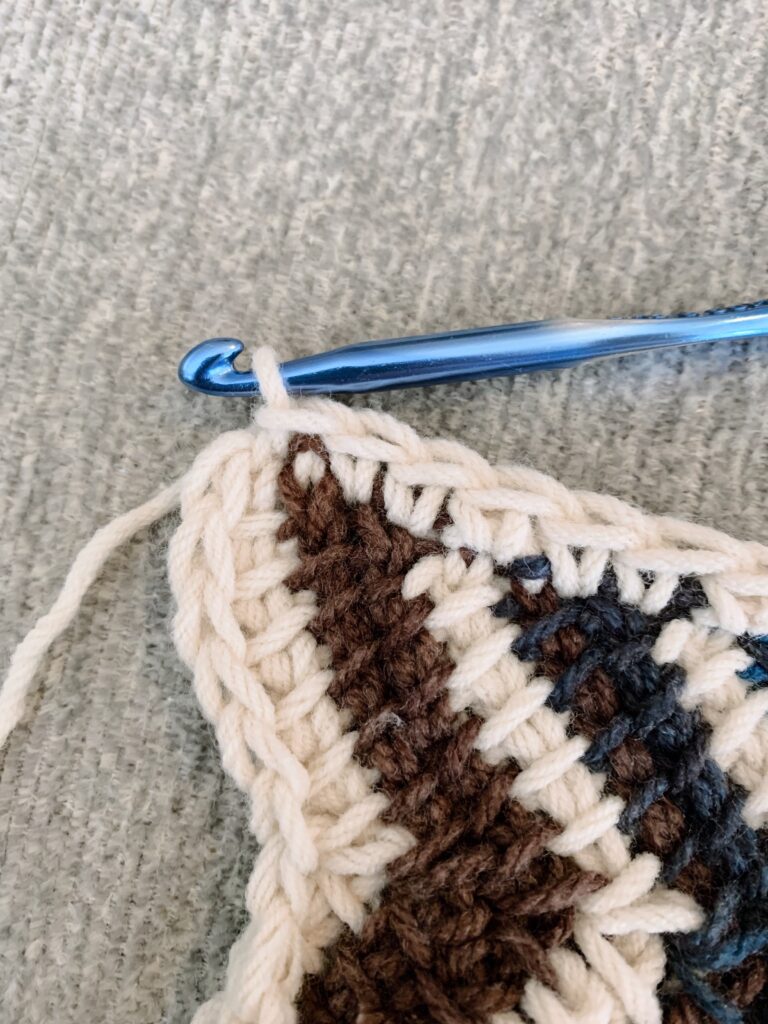
For Border (See Picture tutorial below)
The border is only stitched on the sides of the blanket and not the ends.
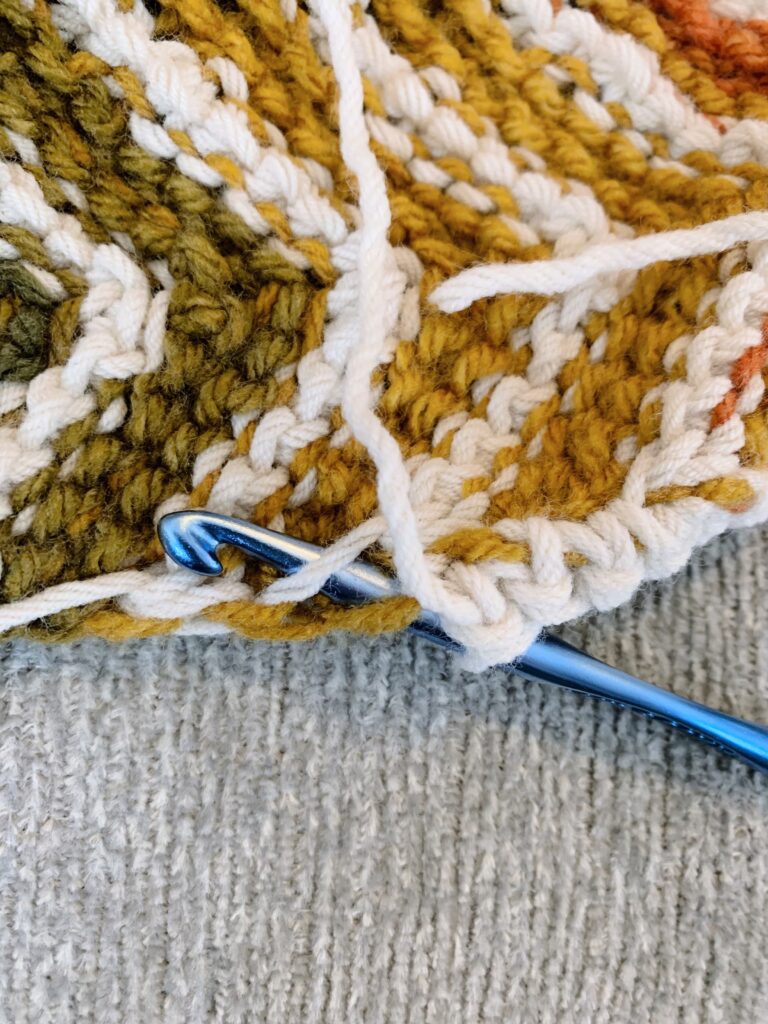
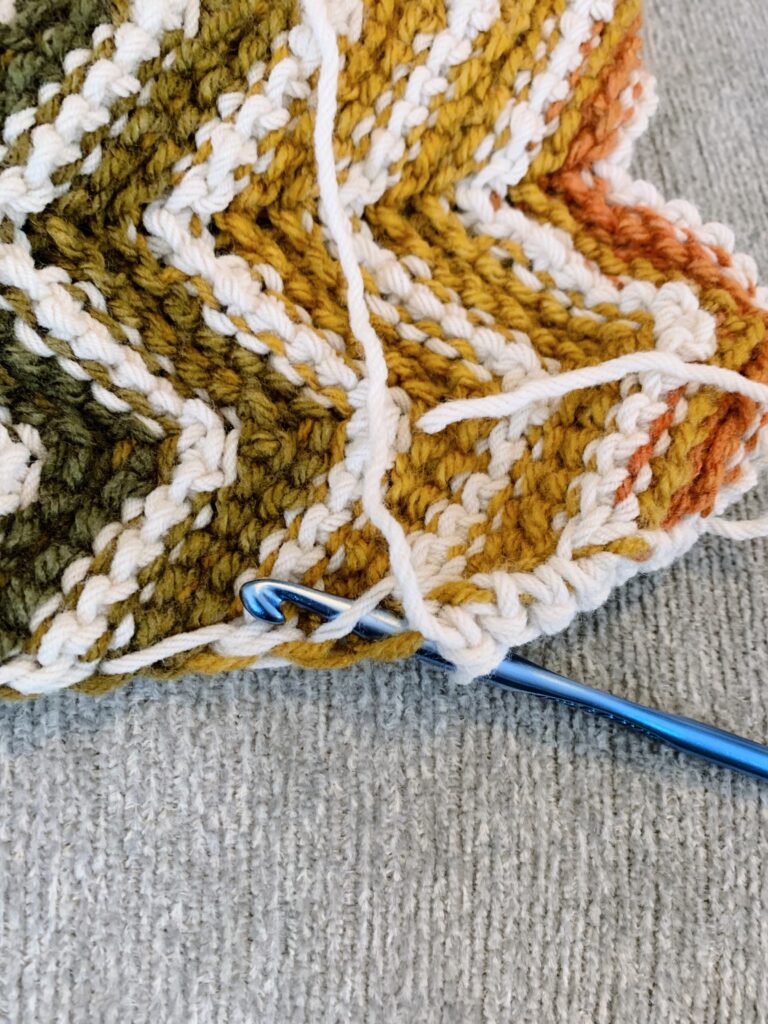
On one side of the blanket, you'll notice the yarn that has been carried up when switching colors; be sure to grab this when you are crocheting the border (see picture example on the next page).
Switching to 6 mm regular crochet hook, attach yarn A to corner, ch 1, sc in next st (making sure you grab the cream-colored yarn that has been carried up), sc in each st to end, sl st in last st
Fasten off, weave in ends
For the other side, attach yarn to corner, ch 1, sc in next st, sc in each st along edge to end, sl st in last st
Fasten off, weave in ends
Block blanket if desired
Congrats! You're finished. 🙂
Tammi says
Hi Julie! I just LOVE your patterns and have made several of your blankets and they have turned out perfect, so I could hardly wait for this one to come out! Thanks for being so clear on the explanations and pics of tricky stitches! Couple questions on the yarns for this one: I noticed that the premium yarn on sale says that it will send you ONE of the colors from the neutral line. If I ordered enough for this blanket, will I get the same color or will there be a random variety from the neutral line?
Second question on the Mandala yarn color: Your pics show a nice combination of muted colors, however, the pic in the website show it MUCH brighter, so would you say the yarn on your pics is more accurate than the one on their site? I'm hoping for more muted, so a bit nervous to pull the trigger if it is closer to the one on their site (I like some color, but not too bright).
Thanks for all you do...you are amazing!
Julie says
Hi Tammi!
Thank you so much!! 🙂
So, as far as the premium yarn, I ordered around 18 of the "neutral" tones and they were all cream color. The shades are very slightly different from each other, but not enough to notice when you're making a blanket like this one. I also ordered some of the greys and they were just slightly different as well. But I made an entire blanket with it and you couldn't tell at all. The difference is so little.
For the Mandala, the colors Lion Brand shows on their website is definitely a little different from what it looks like when stitched up. They are still bright rainbow colors, but I'd say a little less so than what their website shows. I saw this crochet kit on their website that is made with the same yarn, so maybe take a look at that one as well: bit.ly/3JFl50i
Thank you again for your kind words! It really means a lot to me!
Tammi says
@Julie, Thanks so much, and THANK YOU for posting the alternate in Warlock! Thay's more my color preference, so will be going with that color! Thanks again!